 EZVIZ no longer supports Internet Explorer 10 or earlier versions, and the site may not behave as expected. Please upgrade to a newer browser.


 Store
StoreEZVIZ PC Studio Software
Windows PC Software
Here are usually three ways for you to download the recordings:
1. You can manually record the video while in live view mode or playback mode. While in live view or playback mode > Tap on the "Record" icon to start the manual recording. Once the recordings have been completed, your video will be saved to "My Album" on the EZVIZ APP as well as in the Gallery(Album) on your phone.
2. If you have CloudPlay service or if your camera supports downloading recordings stored in the SD card via the EZVIZ mobile app, you may follow the steps below: enter the live view page > find the video clip you want to save and tap the "Download" button at the bottom right > then tap the recording clip again and it will be added to the download list automatically. Then you may check the recording(s) in "My Album" on the EZVIZ APP as well as in the Gallery(Album) on your phone.
3. Alternatively, for some specific models, if you want to export the recordings saved on the SD card, you can also do it through EZVIZ Studio by following the steps below:
1) Download and install the EZVIZ PC studio on a Windows PC
2) Put the camera and PC under the same LAN
3) Configure the Advanced settings by following the instructions here
4) Click All devices and enter the Advanced Settings--Storage--File, then choose the date you want to and export it
*Related Articles:
Models that support the direct downloading of videos stored on an SD card through the EZVIZ App
1. Install the EZVIZ Studio on your Windows PC and make sure that your EZVIZ devices and PC are on the same LAN.
2. After installation, you will need to log in to your EZVIZ account first.
3. Then go to the root directory of Ezviz Studio on your PC and find the folder named “config”.
4. Copy the file named "AppConfig.ini" in the folder of "config" to your Desktop. Then open "AppConfig.ini" on the Desktop and you will see the following commands.
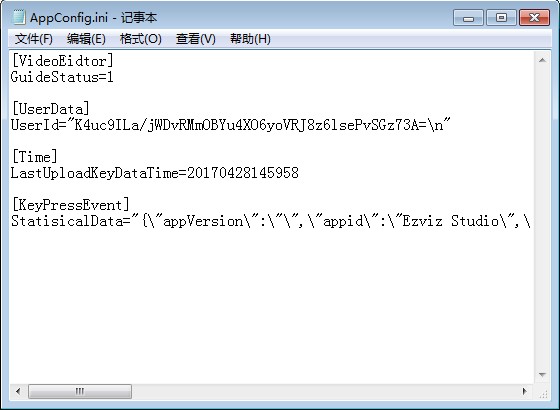
5. Add the following command to "AppConfig.ini" and click "Save" before exiting:
[LocalOperation]
Show=1
6. Copy the "AppConfig.ini" file from your Desktop into the folder of “config” and overlay the old one.
7. Refresh the device page in Ezviz Studio or reopen the Studio, then you will see the “Advanced”.
8. If you want to hide the “Advanced” setting, please change the command “Show=1” to “Show=0”, then reopen the EZVIZ studio.
Please kindly note that the device is programmed to timeout every few minutes if you are streaming through our VTDU servers. You can simply tap on the "Continue" button to continue streaming. Besides, if your device supports the LAN Live View feature, you can avoid this by putting your camera and your phone or PC under the same LAN (connecting to the same network), and then going to the More page (click the profile photo on the left top corner) > Settings > LAN Live View (for mobile phone) or Devices on LAN (for PC Studio). There you could view the camera continuously.
However, even when you are on the same network, you should ensure that the computer you are using is connected to the router using a cable, or if you are using a mobile phone or tablet, please ensure that you have Upnp enabled on your router.
Method 1: Log into your EZVIZ account via the EZVIZ app, enter the Live View page, select the time, and tap the video you want to view to playback.
Method 2: Log into your EZVIZ account via the EZVIZ Studio PC application, tap the device you want to view, and click the "Gallery" at the bottom left corner of the device's live view page, select the time and date to playback.
Method 3: You may insert the SD card into an SD card reader, and use the VS player or EZVIZ MP4 player to view the recordings.
Click here to download the VS player and here to download the EZVIZ MP4 player.
