EZVIZ no longer supports Internet Explorer 10 or earlier versions, and the site may not behave as expected. Please upgrade to a newer browser.


 Store
StoreEZVIZ PC Studio Software
Windows PC Software


using your EZVIZ App

using your EZVIZ App

using your EZVIZ App

using your EZVIZ App

using your EZVIZ App

using your EZVIZ App

using your EZVIZ App

using your EZVIZ App


Connecting your EZVIZ security cameras with voice assistant(s), such as Amazon Alexa and Google Home, is a simple process.
Checklist before setting up:
√ Make sure you have downloaded EZVIZ App and Amazon’s Alexa App/Google Home App on your phone.
√ Make sure your EZVIZ security camera has been added to EZVIZ App successfully;
√ Turn off ‘Image Encryption’ of your EZVIZ security camera:
1) Log in to your EZVIZ App and go to device setting;
2) Look for ‘Image Encryption’ and tap to turn it off.
3) Enter the verification code (as the default password) to apply the change.
√ Change the name of your EZVIZ security camera:
1) Go to device setting
2) Tap on ‘name’ and change it based on your need, such as ‘front door camera’ or ‘baby room camera’.
Enable EZVIZ skills on Amazon Alexa
Video tutorial: https://youtu.be/ro3Y8AkXJ7M
1. Log in to your Alexa App.
2. Choose ‘Add Device’ from the menu.
3. Choose ‘Camera’ and select EZVIZ to enable the skill.
4. Enter your EZVIZ username and password in order to authorize Alexa to access your EZVIZ account.
5. Tap ‘Discover Devices’ to allow Alexa to discover all your EZVIZ devices.
6. Go back to Alexa app menu and you should see all your EZVIZ devices under ‘Cameras’.
Connect EZVIZ devices to Google Home
Video tutorial: https://youtu.be/v3nrrosYRr8
1. Log in to your Google Home App.
2. On the home screen, tap ‘Add’, then ‘Set up device.’
3. Select ‘Have something already set up?’
4. Type and search ‘EZVIZ’, then select it.
5. Enter your EZVIZ username and password in order to authorize Google Home to access your EZVIZ account.
6. Once the device is linked successfully, follow the prompts to finish the setup.
If you encounter difficulties when trying to initialize the SD card via the EZVIZ APP, below are some troubleshooting steps to resolve the issue for you:
1. Ensure both the firmware of your camera and EZVIZ APP are running on the latest version.
2. Ensure the SD card is class 10 or rated at UHS-1. The file format of the SD card should be FAT32 for capacities below 64GB and exFAT for capacities of 64GB and above. Click "Here" to view partial test results of SD card compatibility.
3. Power off your camera, remove and reinsert the SD card, power the camera on and then initialize the card again on the EZVIZ APP.
4. To further rule out the SD card issue, you may try to test with a different SD card or install the card in question on another EZVIZ device.
5. Try to factory reset your camera by holding the Reset button. This will turn the device to the default factory settings and might help resolve minor issues.
If the issue remains unresolved, please contact the "EZVIZ support team" for further assistance.
1. Download the EZVIZ APP to your mobile phone from the App Store (for iOS), Google Play (for Android), or HUAWEI APP Gallery (for HUAWEI).
2. Register an EZVIZ account with your email or phone number and log in.
3. Reset your camera by pressing the reset button for about 10-15 seconds, for some cameras you will hear the voice of "Reset successfully". Then wait for about 1 minute or a few seconds, when you see the indicator light change into red-blue flashing alternately or blue light flashing fast (for some cameras, there is no light change for your reference, that's ok, you just wait for about 1 minute).
4. Connect your phone to 2.4G wifi only, then tap the "+" button on the home page to scan the QR code that is on the label of the device. You can find a label on the back or bottom of the device. (Please make sure your phone is connected to 2.4G wifi only and you give the camera permission to the EZVIZ app)
5. Then follow the instructions on the APP to connect the device to your wifi.
6. After adding the device to your account, you will be able to view your cameras.
*Related Articles:
What should I do if I have lost my EZVIZ device verification code
What should I do when the Wi-Fi connection fails during device pairing?
1. Firstly, please make sure that the camera is online and has a strong and stable network connection.
2. Ensure that the Alarm Notification feature is enabled in the EZVIZ APP.
For most EZVIZ cameras, you can check this as follows: from the Home page, tap the three-dot icon to enter the Device Settings page, tap "Alarm Notification" and enable it; or for other specific models, tap "Notification", enable "Receive Device Message" for App-side and make sure "EZVIZ App Notification" is also enabled.
3. Please also delete any notification schedules you have set before by following the steps below:
On the Alarm Notification page, tap Set Notification Schedule and delete your schedules, then disable the Notification Schedule button;
Alternatively, for other specific models, on the "Notification" page, tap "Notification Schedule", enter "Customized schedule" and clear the time periods you have set, then go back to select the “All time” option.
4. Once you have done the above, run a test to see if the camera can be triggered normally or not.
Make sure you select “soft” or “intensive” as the camera detection sound, and then wave your hands in front of the camera lens until you can hear the "beep" sound. If not, please reset the camera by pressing the Reset button and reconfigure the camera to if this solves the problem.
To reset the EZVIZ cameras, locate the reset button on the camera and hold it for about 4-5 seconds, then wait for a prompt indicating that the device has been reset successfully. Some cameras may not provide this prompt; in such cases, wait for 1-2 minutes for the indicator lights to flash blue or alternate between red and blue. Generally, the reset process takes about 1-2 minutes, after which the camera will revert to its default settings.
For Wi-Fi cameras, the reset button is typically located on the back of the device. For some indoor PT cameras, you may need to rotate the lens to the top to find the reset button, or it may be hidden under the cover of the SD card slot. For certain outdoor devices, look for the cover labeled "Micro SD" or “Micro SD/Reset” and upon opening it, you will find a small reset button.
Wait for about 5 minutes, and then use the "Forgot Password" function to retrieve the password for your account.
1. Click "Forgot Password" on the login page of EZVIZ mobile app.
2. Enter the user's mobile phone number or email address, depending on how the account was registered.
3. A 4-digit verification code will be sent to the user to enter and complete his/her password change or recovery.
1. Please check the status of the indicator light first:
- If it is solid blue or flashing blue slowly, please refresh the home page on the EZVIZ APP to check whether the camera becomes online or not.
- If the indicator light is flashing red slowly, you can try the following two methods:
1) Please reboot your router as it may be experiencing connectivity and range issues.
2) Unplug your camera, wait for 10-30 seconds, then plug it back in to see if this solves the offline problem.
2. If the camera is still offline, you can try to reconfigure it by following the steps below:
- Connect your smartphone to your 2.4GHz home Wi-Fi network if your camera supports 2.4GHz only.
- Open your EZVIZ APP, tap the three-dot icon to enter the Device Settings page and tap the Wi-Fi button.
- Reset the device by pressing the reset button for a few seconds.
- Wait for a while, make sure the indicator light turns to flash blue quickly and tap Next.
- Check that your WIFI and password are correct. Then tap Next to connect to device AP.
- Please wait for the device to be configured and your device should be back online.
Here are usually three ways for you to download the recordings:
1. You can manually record the video while in live view mode or playback mode. While in live view or playback mode > Tap on the "Record" icon to start the manual recording. Once the recordings have been completed, your video will be saved to "My Album" on the EZVIZ APP as well as in the Gallery(Album) on your phone.
2. If you have CloudPlay service or if your camera supports downloading recordings stored in the SD card via the EZVIZ mobile app, you may follow the steps below: enter the live view page > find the video clip you want to save and tap the "Download" button at the bottom right > then tap the recording clip again and it will be added to the download list automatically. Then you may check the recording(s) in "My Album" on the EZVIZ APP as well as in the Gallery(Album) on your phone.
3. Alternatively, for some specific models, if you want to export the recordings saved on the SD card, you can also do it through EZVIZ Studio by following the steps below:
1) Download and install the EZVIZ PC studio on a Windows PC
2) Put the camera and PC under the same LAN
3) Configure the Advanced settings by following the instructions here
4) Click All devices and enter the Advanced Settings--Storage--File, then choose the date you want to and export it
*Related Articles:
Models that support the direct downloading of videos stored on an SD card through the EZVIZ App
Most
products are configured to support 2.4 GHz Wi-Fi network mode; however, some
products do support 5 GHz. The following products support 2.4/5 GHz Wi-Fi
network mode:
DB1, Mini Plus, C6P, C6, C6Wi, E6, H6, DB1C, DB1 pro, HP7 support 2.4 GHz & 5 GHz.
Sports camera S5 Plus supports 2.4 GHz & 5 GHz.
Router W3 support dual band 2.4 GHz and 5 GHz.
All other security cameras support only 2.4 GHz Wi-Fi network mode.
There are two methods:
Method A: online upgrade
1. Use EZVIZ SPORTS App.
2. If there is a new firmware release, then the app will have a notification. You can according to the notification upgrade or not.
Method B: offline upgrade
1. Visit the EZVIZ support center (https://service.ezvizlife.com/download) to download the new firmware.
2. Input the new firmware to the SD card.
3. Reboot the action camera, then it automatically upgrades.
4. After upgrade success, the camera will reboot again
Note: the new firmware should be put in the outermost directory. The camera power should be over 50% when upgraded.
It is estimated that for a 1080P EZVIZ security camera, a 16GB Micro SD card will provide approximately 28-32 days of recording under normal use, which is about 1 hour of motion event recordings a day. Recording time for 720p cameras will be longer.
Here is the estimated number of required spaces for your reference. Please note that the actual space taken up may vary depending on the operating environment and other factors.
| EZVIZ Model | Max. required space for one-day recording(GB) | Min. recording time per capacity of SD Card(days) | |||
| 16G | 32G | 64G | 128G | ||
| DP1,DP1C | 7.5 | 2.1 | 4.3 | 8.5 | 17.1 |
BC1,BC1C,BC2 C1C-720P,C1T-1080P DB1C,DP2,DP2C | 10.7 | 1.5 | 3 | 6 | 12 |
BC1-4MP,BC1C-4MP,HB8 C1C-1080P,C1C-B,C1HC H.265,C2C H.265 C3N,C3TN-2MP,C3TN-Color,C3W Pro-2MP,C3X C6N-1080P,TY1-1080P,TY2-1080P,C8C,C8C-LITE DB1 Pro,DB2,DB2 Pro,LC1C | 21.4 | 0.7 | 1.5 | 3 | 6 |
C3TN-3MP (OutPro),H3 C6N-3MP,CP1-3MP,C8W PRO-2K | 32.1 | 0.5 | 1 | 2 | 4 |
C3W Pro-4MP C6,C6N-4MP,C6W-4MP,CP1-4MP,TY1-4MP C8PF,C8W-4MP,LC3 | 42.8 | 0.4 | 0.7 | 1.5 | 3 |
| C8W PRO-3K | 53.5 | 0.3 | 0.6 | 1.2 | 2.4 |
The information listed in the following compatibility chart is only based on our lab test results. The actual performance and compatibility might vary due to the third factor (such as the change of manufacturing method and raw material) from time to time. For other EZVIZ devices not listed on the table, you may refer to those manufacturers and models that have passed our tests.
Important note: Currently, based on our lab test results, sorry to tell you that the Kingston CANVAS Select Plus series of SD cards may not work on our EZVIZ devices.
| CS-C1C-D0-1D1WFR | CS-C1C-D0-1D2WFR | |
|---|---|---|
| Kingston | ||
| Kingston 256GB | √ | √ |
| Kingston 128GB | √ | √ |
| Kingston 64GB | √ | √ |
| Kingston 32GB | √ | √ |
| Samsung | ||
| Samsung 256GB | √ | √ |
| Samsung 128GB | √ | √ |
| Samsung 64GB | √ | √ |
| Samsung 32GB | √ | √ |
| Samsung EVO 256GB | √ | √ |
| Samsung EVO 128GB | √ | √ |
| Samsung EVO 32GB | √ | √ |
| Samsung EVO 64GB | √ | √ |
| Samsung EVO Plus 128GB | √ | √ |
| Samsung EVO Plus 256GB | √ | √ |
| Samsung PRO 128GB | √ | √ |
| Samsung PRO 64GB | √ | √ |
| Samsung PRO 32GB | √ | √ |
| Sandisk | ||
| Sandisk 64GB | √ | √ |
| Sandisk 32GB | √ | √ |
| Sandisk Ultra 256GB | √ | √ |
| Sandisk Ultra 128GB | √ | √ |
| Sandisk Ultra 64GB | √ | √ |
| Sandisk Ultra 32GB | √ | √ |
| Sandisk Extreme 256GB | √ | √ |
| Sandisk Extreme 128GB | √ | √ |
| Sandisk Extreme 64GB | √ | √ |
| Sandisk Extreme PRO 256GB | √ | √ |
| Sandisk Extreme PRO 128GB | √ | √ |
| Sandisk Extreme PRO 64GB | √ | √ |
| CS-CV206-C0-1A1WFR | |
|---|---|
| Kingston | |
| Kingston 256GB | √ |
| Kingston 128GB | √ |
| Kingston 64GB | √ |
| Kingston 32GB | √ |
| Samsung | |
| Samsung 256GB | √ |
| Samsung 128GB | √ |
| Samsung 64GB | √ |
| Samsung 32GB | √ |
| Samsung EVO 256GB | √ |
| Samsung EVO 128GB | √ |
| Samsung EVO 32GB | √ |
| Samsung EVO 64GB | √ |
| Samsung EVO Plus 128GB | √ |
| Samsung EVO Plus 256GB | √ |
| Samsung PRO 128GB | √ |
| Samsung PRO 64GB | √ |
| Samsung PRO 32GB | √ |
| Sandisk | |
| Sandisk 64GB | √ |
| Sandisk 32GB | √ |
| Sandisk Ultra 256GB | √ |
| Sandisk Ultra 128GB | √ |
| Sandisk Ultra 64GB | √ |
| Sandisk Ultra 32GB | √ |
| Sandisk Extreme 256GB | √ |
| Sandisk Extreme 128GB | √ |
| Sandisk Extreme 64GB | √ |
| Sandisk Extreme PRO 256GB | √ |
| Sandisk Extreme PRO 128GB | √ |
| Sandisk Extreme PRO 64GB | √ |
| CS-CV246-B0-1C1WFR | CS-CV246-A0-1C2WFR | |
|---|---|---|
| Kingston | ||
| Kingston 256GB | √ | √ |
| Kingston 128GB | √ | √ |
| Kingston 64GB | √ | √ |
| Kingston 32GB | √ | √ |
| Samsung | ||
| Samsung 256GB | √ | √ |
| Samsung 128GB | √ | √ |
| Samsung 64GB | √ | √ |
| Samsung 32GB | √ | √ |
| Samsung EVO 256GB | √ | √ |
| Samsung EVO 128GB | √ | √ |
| Samsung EVO 32GB | √ | √ |
| Samsung EVO 64GB | √ | √ |
| Samsung EVO Plus 128GB | √ | √ |
| Samsung EVO Plus 256GB | √ | √ |
| Samsung PRO 128GB | √ | √ |
| Samsung PRO 64GB | √ | √ |
| Samsung PRO 32GB | √ | √ |
| Sandisk | ||
| Sandisk 64GB | √ | √ |
| Sandisk 32GB | √ | √ |
| Sandisk Ultra 256GB | √ | √ |
| Sandisk Ultra 128GB | √ | √ |
| Sandisk Ultra 64GB | √ | √ |
| Sandisk Ultra 32GB | √ | √ |
| Sandisk Extreme 256GB | √ | √ |
| Sandisk Extreme 128GB | √ | √ |
| Sandisk Extreme 64GB | √ | √ |
| Sandisk Extreme PRO 256GB | √ | √ |
| Sandisk Extreme PRO 128GB | √ | √ |
| Sandisk Extreme PRO 64GB | √ | √ |
| CS-CV310-A0-1C2WFR | |
|---|---|
| Kingston | |
| Kingston 256GB | √ |
| Kingston 128GB | √ |
| Kingston 64GB | √ |
| Kingston 32GB | √ |
| Samsung | |
| Samsung 256GB | √ |
| Samsung 128GB | √ |
| Samsung 64GB | √ |
| Samsung 32GB | √ |
| Samsung EVO 256GB | √ |
| Samsung EVO 128GB | √ |
| Samsung EVO 32GB | √ |
| Samsung EVO 64GB | √ |
| Samsung EVO Plus 128GB | √ |
| Samsung EVO Plus 256GB | √ |
| Samsung PRO 128GB | √ |
| Samsung PRO 64GB | √ |
| Samsung PRO 32GB | √ |
| Sandisk | |
| Sandisk 64GB | √ |
| Sandisk 32GB | √ |
| Sandisk Ultra 256GB | √ |
| Sandisk Ultra 128GB | √ |
| Sandisk Ultra 64GB | √ |
| Sandisk Ultra 32GB | √ |
| Sandisk Extreme 256GB | √ |
| Sandisk Extreme 128GB | √ |
| Sandisk Extreme 64GB | √ |
| Sandisk Extreme PRO 256GB | √ |
| Sandisk Extreme PRO 128GB | √ |
| Sandisk Extreme PRO 64GB | √ |
| CS-CV310-A0-1B2WFR | CS-CV310-A0-3B1WFR | |
|---|---|---|
| Kingston | ||
| Kingston 256GB | √ | √ |
| Kingston 128GB | √ | √ |
| Kingston 64GB | √ | √ |
| Kingston 32GB | √ | √ |
| Samsung | ||
| Samsung 256GB | √ | √ |
| Samsung 128GB | √ | √ |
| Samsung 64GB | √ | √ |
| Samsung 32GB | √ | √ |
| Samsung EVO 256GB | √ | √ |
| Samsung EVO 128GB | √ | √ |
| Samsung EVO 32GB | √ | √ |
| Samsung EVO 64GB | √ | √ |
| Samsung EVO Plus 128GB | √ | √ |
| Samsung EVO Plus 256GB | √ | √ |
| Samsung PRO 128GB | √ | √ |
| Samsung PRO 64GB | √ | √ |
| Samsung PRO 32GB | √ | √ |
| Sandisk | ||
| Sandisk 64GB | √ | √ |
| Sandisk 32GB | √ | √ |
| Sandisk Ultra 256GB | √ | √ |
| Sandisk Ultra 128GB | √ | √ |
| Sandisk Ultra 64GB | √ | √ |
| Sandisk Ultra 32GB | √ | √ |
| Sandisk Extreme 256GB | √ | √ |
| Sandisk Extreme 128GB | √ | √ |
| Sandisk Extreme 64GB | √ | √ |
| Sandisk Extreme PRO 256GB | √ | √ |
| Sandisk Extreme PRO 128GB | √ | √ |
| Sandisk Extreme PRO 64GB | √ | √ |
| CS-CV248-A0-32WFR | |
|---|---|
| Kingston | |
| Kingston 256GB | √ |
| Kingston 128GB | √ |
| Kingston 64GB | √ |
| Kingston 32GB | √ |
| Samsung | |
| Samsung 256GB | √ |
| Samsung 128GB | √ |
| Samsung 64GB | √ |
| Samsung 32GB | √ |
| Samsung EVO 256GB | √ |
| Samsung EVO 128GB | √ |
| Samsung EVO 32GB | √ |
| Samsung EVO 64GB | √ |
| Samsung EVO Plus 128GB | √ |
| Samsung EVO Plus 256GB | √ |
| Samsung PRO 128GB | √ |
| Samsung PRO 64GB | √ |
| Samsung PRO 32GB | √ |
| Sandisk | |
| Sandisk 64GB | √ |
| Sandisk 32GB | √ |
| Sandisk Ultra 256GB | √ |
| Sandisk Ultra 128GB | √ |
| Sandisk Ultra 64GB | √ |
| Sandisk Ultra 32GB | √ |
| Sandisk Extreme 256GB | √ |
| Sandisk Extreme 128GB | √ |
| Sandisk Extreme 64GB | √ |
| Sandisk Extreme PRO 256GB | √ |
| Sandisk Extreme PRO 128GB | √ |
| Sandisk Extreme PRO 64GB | √ |
| CS-CV248-A0-32WMFR | |
|---|---|
| Kingston | |
| Kingston 256GB | √ |
| Kingston 128GB | √ |
| Kingston 64GB | √ |
| Kingston 32GB | √ |
| Samsung | |
| Samsung 256GB | √ |
| Samsung 128GB | √ |
| Samsung 64GB | √ |
| Samsung 32GB | √ |
| Samsung EVO 256GB | √ |
| Samsung EVO 128GB | √ |
| Samsung EVO 32GB | √ |
| Samsung EVO 64GB | √ |
| Samsung EVO Plus 128GB | √ |
| Samsung EVO Plus 256GB | √ |
| Samsung PRO 128GB | √ |
| Samsung PRO 64GB | √ |
| Samsung PRO 32GB | √ |
| Sandisk | |
| Sandisk 64GB | √ |
| Sandisk 32GB | √ |
| Sandisk Ultra 256GB | √ |
| Sandisk Ultra 128GB | √ |
| Sandisk Ultra 64GB | √ |
| Sandisk Ultra 32GB | √ |
| Sandisk Extreme 256GB | √ |
| Sandisk Extreme 128GB | √ |
| Sandisk Extreme 64GB | √ |
| Sandisk Extreme PRO 256GB | √ |
| Sandisk Extreme PRO 128GB | √ |
| Sandisk Extreme PRO 64GB | √ |
| CS-DB1-A0-1B3WPFR | |
|---|---|
| Kingston | |
| Kingston 256GB | X |
| Kingston 128GB | √ |
| Kingston 64GB | √ |
| Kingston 32GB | √ |
| Samsung | |
| Samsung 256GB | X |
| Samsung 128GB | √ |
| Samsung 64GB | √ |
| Samsung 32GB | √ |
| Samsung EVO 256GB | X |
| Samsung EVO 128GB | √ |
| Samsung EVO 32GB | √ |
| Samsung EVO 64GB | √ |
| Samsung EVO Plus 128GB | √ |
| Samsung EVO Plus 256GB | X |
| Samsung PRO 128GB | √ |
| Samsung PRO 64GB | √ |
| Samsung PRO 32GB | √ |
| Sandisk | |
| Sandisk 64GB | √ |
| Sandisk 32GB | √ |
| Sandisk Ultra 256GB | X |
| Sandisk Ultra 128GB | √ |
| Sandisk Ultra 64GB | √ |
| Sandisk Ultra 32GB | √ |
| Sandisk Extreme 256GB | X |
| Sandisk Extreme 128GB | √ |
| Sandisk Extreme 64GB | √ |
| Sandisk Extreme PRO 256GB | X |
| Sandisk Extreme PRO 128GB | √ |
| Sandisk Extreme PRO 64GB | √ |
| CS-C3A-A0-1C2WPMFBR | |
|---|---|
| Kingston | |
| Kingston 256GB | X |
| Kingston 128GB | √ |
| Kingston 64GB | √ |
| Kingston 32GB | √ |
| Samsung | |
| Samsung 256GB | X |
| Samsung 128GB | √ |
| Samsung 64GB | √ |
| Samsung 32GB | √ |
| Samsung EVO 256GB | X |
| Samsung EVO 128GB | √ |
| Samsung EVO 32GB | √ |
| Samsung EVO 64GB | √ |
| Samsung EVO Plus 128GB | √ |
| Samsung EVO Plus 256GB | X |
| Samsung PRO 128GB | √ |
| Samsung PRO 64GB | √ |
| Samsung PRO 32GB | √ |
| Sandisk | |
| Sandisk 64GB | √ |
| Sandisk 32GB | √ |
| Sandisk Ultra 256GB | X |
| Sandisk Ultra 128GB | √ |
| Sandisk Ultra 64GB | √ |
| Sandisk Ultra 32GB | √ |
| Sandisk Extreme 256GB | X |
| Sandisk Extreme 128GB | √ |
| Sandisk Extreme 64GB | √ |
| Sandisk Extreme PRO 256GB | X |
| Sandisk Extreme PRO 128GB | √ |
| Sandisk Extreme PRO 64GB | √ |
| CS-C6N-A0-1C2WFR | |
|---|---|
| Kingston | |
| Kingston 256GB | √ |
| Kingston 128GB | √ |
| Kingston 64GB | √ |
| Kingston 32GB | √ |
| Samsung | |
| Samsung 256GB | √ |
| Samsung 128GB | √ |
| Samsung 64GB | √ |
| Samsung 32GB | √ |
| Samsung EVO 256GB | √ |
| Samsung EVO 128GB | √ |
| Samsung EVO 32GB | √ |
| Samsung EVO 64GB | √ |
| Samsung EVO Plus 128GB | √ |
| Samsung EVO Plus 256GB | √ |
| Samsung PRO 128GB | √ |
| Samsung PRO 64GB | √ |
| Samsung PRO 32GB | √ |
| Sandisk | |
| Sandisk 64GB | √ |
| Sandisk 32GB | √ |
| Sandisk Ultra 256GB | √ |
| Sandisk Ultra 128GB | √ |
| Sandisk Ultra 64GB | √ |
| Sandisk Ultra 32GB | √ |
| Sandisk Extreme 256GB | √ |
| Sandisk Extreme 128GB | √ |
| Sandisk Extreme 64GB | √ |
| Sandisk Extreme PRO 256GB | √ |
| Sandisk Extreme PRO 128GB | √ |
| Sandisk Extreme PRO 64GB | √ |
| CS-C3N-A0-3H2WFRL | |
|---|---|
| Kingston | |
| Kingston 256GB | √ |
| Kingston 128GB | √ |
| Kingston 64GB | √ |
| Kingston 32GB | √ |
| Samsung | |
| Samsung 256GB | √ |
| Samsung 128GB | √ |
| Samsung 64GB | √ |
| Samsung 32GB | √ |
| Samsung EVO 256GB | √ |
| Samsung EVO 128GB | √ |
| Samsung EVO 32GB | √ |
| Samsung EVO 64GB | √ |
| Samsung EVO Plus 128GB | √ |
| Samsung EVO Plus 256GB | √ |
| Samsung PRO 128GB | √ |
| Samsung PRO 64GB | √ |
| Samsung PRO 32GB | √ |
| Sandisk | |
| Sandisk 64GB | √ |
| Sandisk 32GB | √ |
| Sandisk Ultra 256GB | √ |
| Sandisk Ultra 128GB | √ |
| Sandisk Ultra 64GB | √ |
| Sandisk Ultra 32GB | √ |
| Sandisk Extreme 256GB | √ |
| Sandisk Extreme 128GB | √ |
| Sandisk Extreme 64GB | √ |
| Sandisk Extreme PRO 256GB | √ |
| Sandisk Extreme PRO 128GB | √ |
| Sandisk Extreme PRO 64GB | √ |
| CS-CV310-C0-6B22WFR | |
|---|---|
| Kingston | |
| Kingston 256GB | √ |
| Kingston 128GB | √ |
| Kingston 64GB | √ |
| Kingston 32GB | √ |
| Samsung | |
| Samsung 256GB | √ |
| Samsung 128GB | √ |
| Samsung 64GB | √ |
| Samsung 32GB | √ |
| Samsung EVO 256GB | √ |
| Samsung EVO 128GB | √ |
| Samsung EVO 32GB | √ |
| Samsung EVO 64GB | √ |
| Samsung EVO Plus 128GB | √ |
| Samsung EVO Plus 256GB | √ |
| Samsung PRO 128GB | √ |
| Samsung PRO 64GB | √ |
| Samsung PRO 32GB | √ |
| Sandisk | |
| Sandisk 64GB | √ |
| Sandisk 32GB | √ |
| Sandisk Ultra 256GB | √ |
| Sandisk Ultra 128GB | √ |
| Sandisk Ultra 64GB | √ |
| Sandisk Ultra 32GB | √ |
| Sandisk Extreme 256GB | √ |
| Sandisk Extreme 128GB | √ |
| Sandisk Extreme 64GB | √ |
| Sandisk Extreme PRO 256GB | √ |
| Sandisk Extreme PRO 128GB | √ |
| Sandisk Extreme PRO 64GB | √ |
| CS-CV228-A0-3C2WFR | |
|---|---|
| Kingston | |
| Kingston 256GB | √ |
| Kingston 128GB | √ |
| Kingston 64GB | √ |
| Kingston 32GB | √ |
| Samsung | |
| Samsung 256GB | √ |
| Samsung 128GB | √ |
| Samsung 64GB | √ |
| Samsung 32GB | √ |
| Samsung EVO 256GB | √ |
| Samsung EVO 128GB | √ |
| Samsung EVO 32GB | √ |
| Samsung EVO 64GB | √ |
| Samsung EVO Plus 128GB | √ |
| Samsung EVO Plus 256GB | √ |
| Samsung PRO 128GB | √ |
| Samsung PRO 64GB | √ |
| Samsung PRO 32GB | √ |
| Sandisk | |
| Sandisk 64GB | √ |
| Sandisk 32GB | √ |
| Sandisk Ultra 256GB | √ |
| Sandisk Ultra 128GB | √ |
| Sandisk Ultra 64GB | √ |
| Sandisk Ultra 32GB | √ |
| Sandisk Extreme 256GB | √ |
| Sandisk Extreme 128GB | √ |
| Sandisk Extreme 64GB | √ |
| Sandisk Extreme PRO 256GB | √ |
| Sandisk Extreme PRO 128GB | √ |
| Sandisk Extreme PRO 64GB | √ |
| CS-CV310-A0-32CWFRL | |
|---|---|
| Kingston | |
| Kingston 256GB | √ |
| Kingston 128GB | √ |
| Kingston 64GB | √ |
| Kingston 32GB | √ |
| Samsung | |
| Samsung 256GB | √ |
| Samsung 128GB | √ |
| Samsung 64GB | √ |
| Samsung 32GB | √ |
| Samsung EVO 256GB | √ |
| Samsung EVO 128GB | √ |
| Samsung EVO 32GB | √ |
| Samsung EVO 64GB | √ |
| Samsung EVO Plus 128GB | √ |
| Samsung EVO Plus 256GB | √ |
| Samsung PRO 128GB | √ |
| Samsung PRO 64GB | √ |
| Samsung PRO 32GB | √ |
| Sandisk | |
| Sandisk 64GB | √ |
| Sandisk 32GB | √ |
| Sandisk Ultra 256GB | √ |
| Sandisk Ultra 128GB | √ |
| Sandisk Ultra 64GB | √ |
| Sandisk Ultra 32GB | √ |
| Sandisk Extreme 256GB | √ |
| Sandisk Extreme 128GB | √ |
| Sandisk Extreme 64GB | √ |
| Sandisk Extreme PRO 256GB | √ |
| Sandisk Extreme PRO 128GB | √ |
| Sandisk Extreme PRO 64GB | √ |
Please note that for most EZVIZ devices, there are usually three ways to get the 6 capital letters device code:
1. You can find it on the device label of the EZVIZ device;
- For models such as BC1 and HB3 kit, the default password is the 6-digit capital letter device code located on the white sticker of the base station.
- For models such as DB2 and DB2C kit, the default password is the 6-digit capital letter device code located on the white sticker of the chime.
- For models such as DB1, please remove the cover of the doorbell and scan the code with a third-party QR code scanner.
- If the camera is linked to an NVR/DVR, such as an X4 or X5 device, and if it is initially set up by adding to NVR/DVR directly, the password will be the admin/login password of the NVR/DVR you created for the NVR/DVR during the initial setup.
2. For some models, there is a QR code on the manual cover that contains device information (Note: no such info if on the cover it says, "scan the QR code for detailed manual”). And you can use a third-party QR code scanner to scan it to get the device code;
3. Alternatively, you can find it in the Device QR Code or Verification Code in the camera Settings > Device Info/About on the EZVIZ mobile app if you have previously set up the device with this phone. Apart from this, for some models, if the cameras are online now, you can also tap the eye-like icon, and enter the OTP (one-time password) sent to the e-mail address or phone number you used to register the EZVIZ account, then the verification code will be displayed after verification.
If the methods mentioned above do not resolve your issue, please ensure not to delete the device from your account and promptly reach out to the EZVIZ support team at account@ezviz.com or engage with the online chat agent via the chat window located at the bottom right of this page.
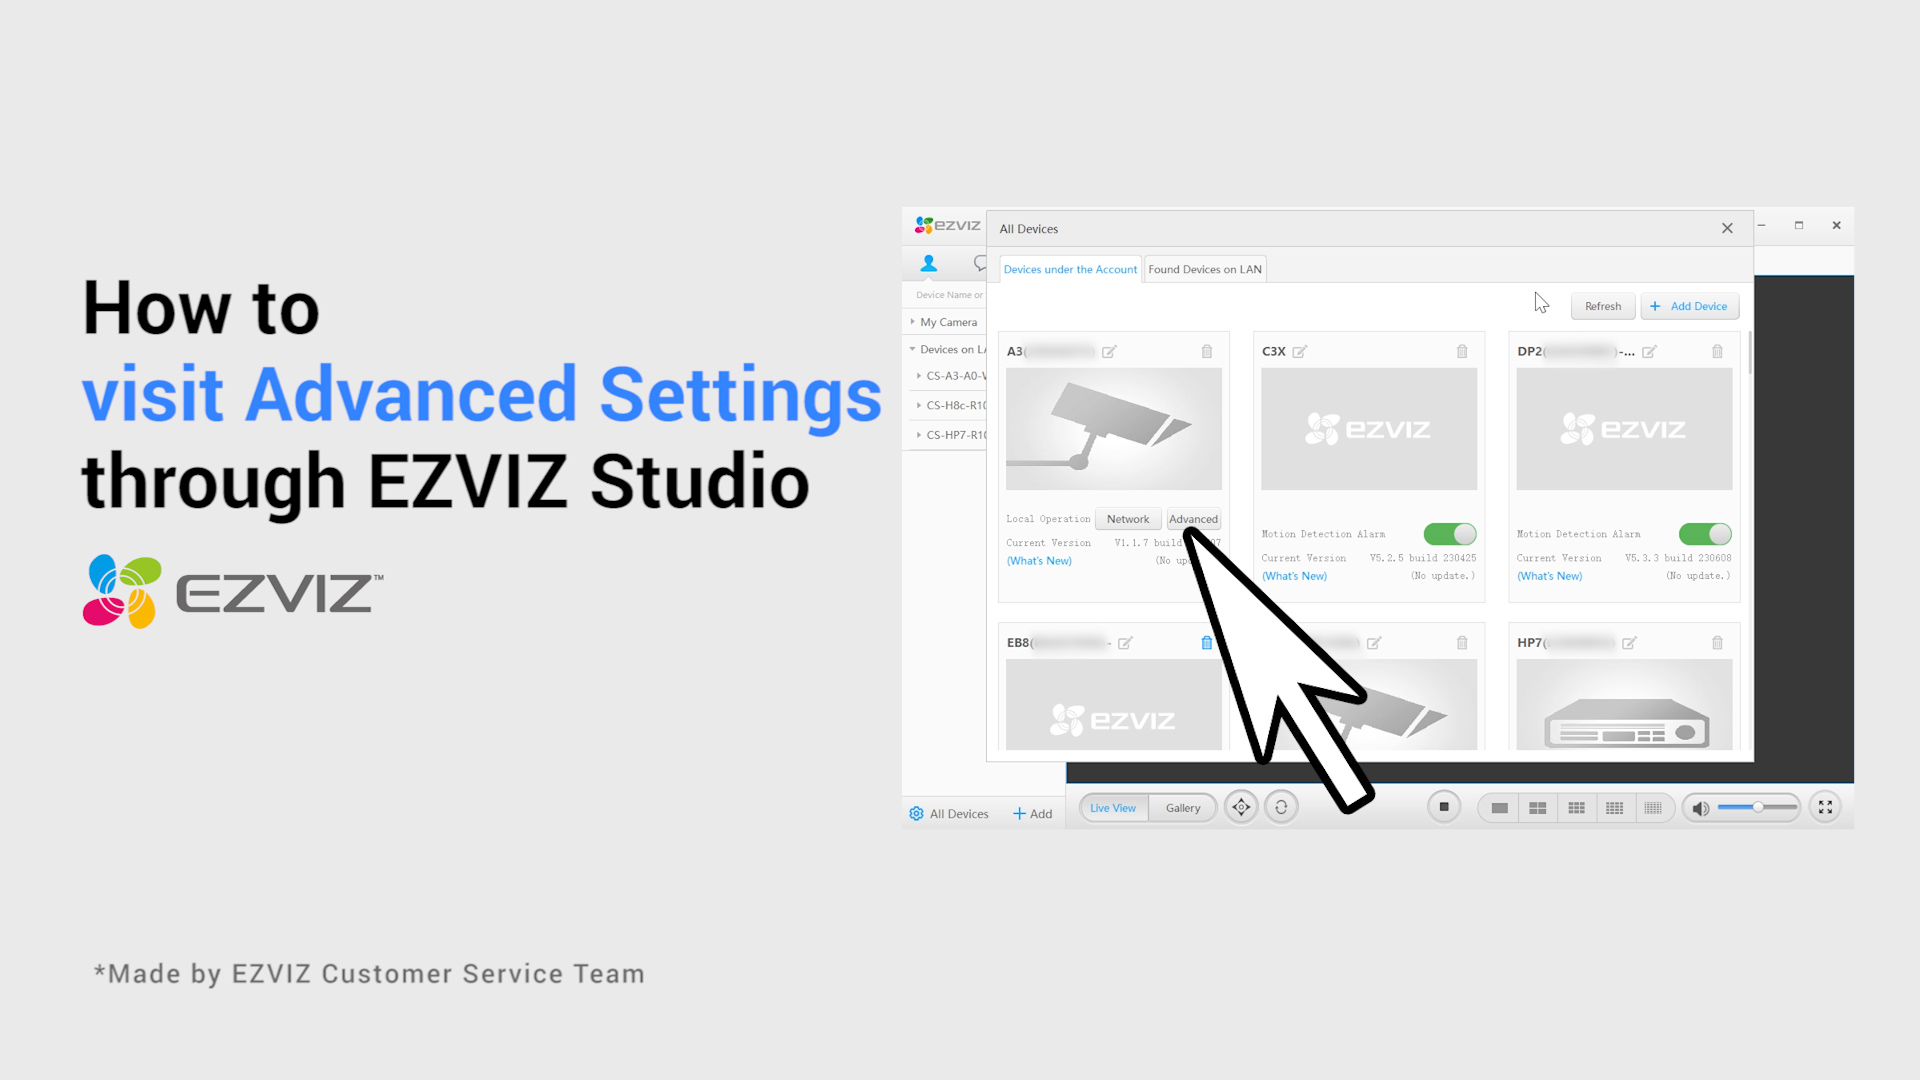
1. Install the EZVIZ Studio on your Windows PC and make sure that your EZVIZ devices and PC are on the same LAN.
2. After installation, you will need to log in to your EZVIZ account first.
3. Then go to the root directory of Ezviz Studio on your PC and find the folder named “config”.
4. Copy the file named "AppConfig.ini" in the folder of "config" to your Desktop. Then open "AppConfig.ini" on the Desktop and you will see the following commands.
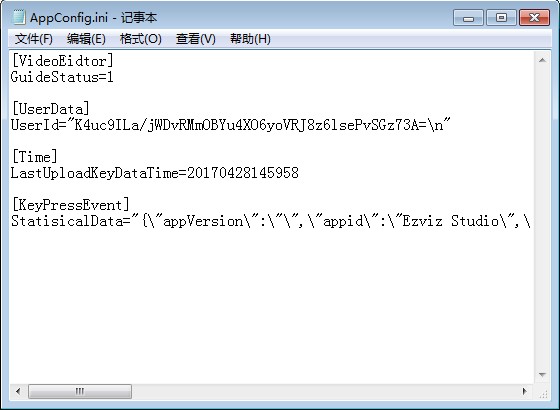
5. Add the following command to "AppConfig.ini" and click "Save" before exiting:
[LocalOperation]
Show=1
6. Copy the "AppConfig.ini" file from your Desktop into the folder of “config” and overlay the old one.
7. Refresh the device page in Ezviz Studio or reopen the Studio, then you will see the “Advanced”.
8. If you want to hide the “Advanced” setting, please change the command “Show=1” to “Show=0”, then reopen the EZVIZ studio.
Before setting up, please make sure you have already inserted an SD card into your camera and your camera supports 24/7 recording. Please also make sure the SD card has been initialized on the EZVIZ APP before use.
For battery cameras that support Power Plugged-in mode, you can enable the all-day recording function by following the steps below: enter the Device Settings page, tap Working Mode, and select Power Plugged-in mode. Meanwhile, it is highly recommended to keep the camera plugged in while using this feature.
For other models, please open the EZVIZ APP, from the Home Page, tap the three-dot icon next to the camera's name to enter the Device Settings page, scroll down to find Storage Status or Record List, and enable the "All Day" button for the Memory card.
Follow the steps below to delete the camera from your EZVIZ account using your mobile app.
1)Log into the EZVIZ account
2)Tap on the image of the camera to open the "live view" page
3)From the top right corner, tap on the "gear icon" to enter the Device Settings page
4)Swipe down to the bottom, and tap "Delete Device" to unbind it
NOTE for CloudPlay Subscribers: If you are a CloudPlay subscriber the option to "Cancel Subscription" and/or "Delete Video Clips" stored in the EZVIZ Cloud Storage service is also provided here.
WARNING: By selecting the "Delete Video Clips" option here you will be deleting "ALL" video clips stored in the Cloud Service. These CAN NOT be recovered.
Please note that sharing can be done in two different ways:
1. Using the Same Login Credentials: You can view the same device using the same login credentials. This means that if you provide your friend or family member with your email address or phone number associated with your EZVIZ account, along with the password, they can access the same device on that account simultaneously.
2. Sharing Your Device with Friends: This method allows you to grant friends and family the privilege to view your device without them owning it. You can achieve this using the EZVIZ App by following these steps:
- Step 1: Log in to your EZVIZ account, and tap the "Account" button in the lower right corner of the Home page.
- Step 2: Tap "Family & Guests".
- Step 3: Tap "Add Sharing".
- Step 4: Enter the email address or phone number registered with the EZVIZ account that you would like to share with, ensuring that the region of the guest account is the same as the owner account, then tap "Continue".
- Step 5: Select the devices you wish to share, and you can edit the permissions by tapping on the device. (Note: Please remember to select "Authorize encryption password” at the bottom; otherwise, the shared account may request the encryption password to view the device.)
- Step 6: Tap "Add sharing" at the bottom. When sharing devices with others, consent is required first. Therefore, toggle the two agreements of "EZVIZ family sharing service" and "EZVIZ service agreement" on the left side and tap "Agree" to proceed further.
Once the guest account accepts the invitation, the devices will be successfully shared. If the issue remains unresolved, please contact the "EZVIZ support team" for further assistance.
*Please note that sharing functionality is not supported on all EZVIZ devices. If your device does not appear in the sharing list during the sharing process, it indicates that it cannot be shared.
1. If you registered an account via email, please check your junk mail. If you still do not receive the verification code, you may have an email filter/block that is restricting this email. Please check with your email provider.
2. If you registered an account using a mobile phone number, please confirm that your mobile phone can receive SMS short codes. You can also try clearing the cache on your phone, restarting your phone, or inserting the SIM card into another phone to see if you can receive it.
3. If the issue persists after following the above steps and you need additional assistance, please provide your camera's SN, your phone number/email address, your country, the time of your request and a short video of the issue to the support center at support@ezviz.com.
If you have already installed an SD card in your camera, but the status on the EZVIZ APP shows "No memory card" or "Please insert an SD card", below are some troubleshooting steps to resolve the issue for you:
Step 1: Ensure both the firmware of your camera and the EZVIZ APP are running on the latest version.
Step 2: Ensure the SD card is class 10 or rated at UHS-1. The file format of the SD card should be FAT32 for capacities below 64GB and exFAT for capacities of 64GB and above.
We do recommend you check the compatible list on our website.
Step 3: Power off your camera, remove and reinsert the SD card, power the camera on, and then initialize the card again on the EZVIZ APP if the SD card can be recognized. Meanwhile, please make sure that the card has been installed correctly and is not defective or damaged.
*Before initialization, do remember to backup important files by saving or exporting them if necessary.
Step 4: If not working, try to factory reset your camera by holding the Reset button. This will turn the device to the default factory settings and might help resolve minor issues.
Step 5: To further rule out the SD card issue, you may try to test with a different SD card or install the card in question on another EZVIZ device.
Please follow the steps below:
1. Log in to your EZVIZ account.
2. On the Home page, click the 3-dot icon next to the name of your camera to enter the Device Settings page.
3. Turn on the Alarm Notification button, then you will be able to receive the messages when motion detection is triggered. Turn off the Alarm Notification button if you do not want to receive alerts.
4. For some other models, you need to enter Notification on the Settings page, enable Receive Device Message and EZVIZ App Notification. You may disable the Receive Device Message feature if you do not want to receive alerts.
To connect to a different Wi-Fi network, please follow the steps below:
1. Press and hold the RESET button on your camera for about 5-10 seconds to reset it. This will allow you to start the process of reconnecting the device to the Wi-Fi.
2. Make sure your EZVIZ device is in Wi-Fi configuration mode.
3. Open the EZVIZ mobile app on your smartphone.
4. From the Home page of the app, tap the 3-dot icon next to the name of your camera to enter the Device Settings page.
5. Tap the "Wi-Fi" or "Network Settings>Wi-Fi".
6. Follow the prompts and instructions in the EZVIZ mobile app to complete the setup and connect your device to the new Wi-Fi network.
Please follow the steps below:
1. Log in to your EZVIZ account.
2. On the Home page, click the 3-dot icon next to the name of your camera to enter the Device Settings page.
3. Turn on the Alarm Notification button, then you will be able to receive the messages when motion detection is triggered.
4. For some other models, you need to enter Notification on the Settings page, enable Receive Device Message and EZVIZ App Notification.
Below recorder models support ONVIF:
-X5S/X5C
-DVR/NVR kits such as X4(if the firmware is the latest)
Below camera models support ONVIF (Please make sure that the device firmware version is the same as or later than the version on the list) :
| Category | Model | Firmware Version |
| Outdoor PT | CS-H8c-R100-1K2WKFL | V5.3.8 build 230829 |
| CS-H8c-R100-1K3WKFL | V5.3.8 build 230828 | |
| CS-H8c-R100-1J4WKFL | V5.3.8 build 230902 | |
| CS-H8-R100-1J5WKFL | V5.3.8 build 231201 | |
| CS-C8W-A0-1J5WKFL | V5.3.8 build 231201 | |
| CS-C8W-A0-1H3WKFL | V5.3.8 build 240307 | |
| CS-C8c-R100-1J4WKFL | V5.3.8 build 230926 | |
| Bullet | CS-H3c-R100-1K2WFL | V5.3.8 build 231115 |
| CS-H3c-R100-1K2WF | V5.3.8 build 231115 | |
| CS-H3c-R100-1K3WKFL | V5.3.8 build 230829 | |
| CS-H3c-R100-1J4WKFL | V5.3.8 build 230914 | |
| CS-H3C-R100-1K2WFL-BR | V5.3.8 build 231115 | |
| CS-C3TN-R100-1K2WFL | V5.3.8 build 231115 | |
| CS-C3TN-R100-1K2WF | V5.3.8 build 231115 | |
| CS-C3TN-R100-1K3WKFL | V5.3.8 build 230829 | |
| CS-H3-R100-1J5WKFL | V5.3.8 build 231127 | |
| CS-H3c-R100-1J5WKFL | V5.3.8 build 240314 | |
| Dome | CS-H4-R201-1H3WKF | V5.3.8 build 231128 |
| Indoor PT | CS-H6c-R105-1L2WF | V5.3.8 build 231109 |
| CS-H6c-R105-1J4WF | V5.3.8 build 231208 | |
| CS-CP1-R105-1L2WF | V5.3.8 build 231109 | |
| CS-CP1-R105-1J4WF | V5.3.8 build 231208 | |
| CS-TY1-R105-1J4WF | V5.3.8 build 231208 | |
| CS-H6-R100-1J5WF | V5.3.8 build 231211 | |
| CS-C6N-D0-8B4WF | V5.3.2 build 231228 | |
| CS-TY1-C0-8B4WF | V5.3.2 build 231228 | |
| CS-CP1-A0-8B4WF | V5.3.2 build 231228 | |
| CS-H6c-R100-8B4WF | V5.3.2 build 231228 | |
| CS-E6-R100-8C5W2F | V5.3.8 build 240304 |
Please follow the steps below:
1. Make sure that the Wi-Fi router is good and functional. You can check it on EZVIZ mobile app by clicking "Network Testing" on the configuration failed page or check if your mobile phone can browse the Internet by turning off data and connecting only to Wi-Fi.
2. For EZVIZ devices that support 2.4G Wi-Fi only, ensure that you connect your mobile phone to 2.4G Wi-Fi before network configuration.
3. Make sure that your Wi-Fi network signal is good. Most EZVIZ devices perform better when the upload speed is higher than 2 Mbps for each camera. You can check your Wi-Fi signal in the EZVIZ mobile app by clicking the "Account" button in the lower corner of the Home Page--Settings--Device Network Tools--Check Wi-Fi Signal.
4. If not good, please follow the steps below to improve your network:
- you can try to move the camera closer to your router, avoid obstacles and interferences such as wall, elevator, microwave, washing machines and Bluetooth devices.
- If possible, unplug some infrequently used devices from your router or reboot the router.
- Try to change the Wi-Fi channel to a less crowded one.
5. Please also review some other network requirements that may help resolve your issue:
- Make sure that DHCP is enabled on your router.
- Verify that IPV6 is turned off on your router.
- Make sure that the blacklist/whitelist firewall settings are turned off on your router.
6. If your camera supports Ethernet cable, you can also try to connect it via cable. Alternatively, if possible, try connecting the camera to another home Wi-Fi.
If the issue remains unresolved, please contact the EZVIZ support team for further assistance.
*Related Articles:
What should I do if the app says "Unable to join network EZVIZ_SN" during the configuration process
What should I do if the app says "Incorrect Device Wi-Fi Password" during the configuration process
What should I do if the device prompts "Incorrect Wi-Fi Password" during the configuration process
Where to find the EZVIZ device verification code
Please follow the steps below:
1. Press and hold the RESET button on your camera for about 5-10 seconds to reset it. This will allow you to start the process of reconnecting the device to the Wi-Fi.
2. Make sure your EZVIZ device is Wi-Fi configuration mode.
3. Open the EZVIZ mobile app on your smartphone.
4. From the Home page of the app, tap the 3-dot icon next to the name of your camera to enter the Device Settings page.
5. Tap the "Wi-Fi" or "Network Settings>Wi-Fi".
6. Follow the prompts and instructions in the EZVIZ mobile app to reconfigure your device to the network.
Please follow the steps below:
1. Log in your EZVIZ account, tap the "Account button” in the lower right corner of the Home page.
2. Enter "My Profile” by clicking the profile picture.
3. Tap "Login Settings”.
4. Then tap "Delete Account”.
5. Please read the Notice carefully before you confirm to Delete My Account.
*Please make sure that all the devices under this account have been removed before you delete your account.
If you have further concerns, please contact the "EZVIZ support team" for further assistance.
If you want to use LAN Live View, you can enter it in the following two ways:
If your phone network is on the same local network as your camera
1 Log in to your EZVIZ account, and tap the profile icon on the top left corner.
2 Tap Settings
3 Scroll down to find LAN Live View
4 Alternatively, if you are unable to log in to your EZVIZ account, you can also access LAN Live View by tapping the play icon on the top right of the login page.
5 Make sure your camera and phone are on the same LAN, then tap Start Scanning.
6 Enter the device verification code as the password (usually located on the white sticker of your camera) and the username is admin by default, and you will be able to view your camera.
If you do not have a network
1 Log in to your EZVIZ account, and tap the profile icon on the upper left corner.
2 Tap Settings
3 Scroll down to find LAN Live View
4 Alternatively, if you are unable to log in to your EZVIZ account, you can also access to LAN Live View by tapping the play icon on the top right of the login page.
5 Reset the camera by pressing the reset button for 4-5 seconds and when the indicator light starts flashing blue quickly, go to the Wi-Fi settings page on your smartphone, connect your phone to the device Wi-Fi named "EZVIZ_SN", and enter the password "EZVIZ_verification code" (the verification code is usually located on the white sticker of your camera), then go back to the EZVIZ app and tap Start Scanning.
6 Enter the device verification code as the password and the username is admin by default, and you will be able to view your camera.
Please follow the steps below:
1. Log in to your EZVIZ account, and tap the "Account" page
2. Tap the profile picture at the top of the page
3. Tap the email or phone number you would like to change(input the code sent to your current email or phone number account if needed)
4. Follow the prompt to input the new email or phone number
5. Then input the code sent to the new email or phone number and the account will be updated
Method 1: Log into your EZVIZ account via the EZVIZ app, enter the Live View page, select the time, and tap the video you want to view to playback.
Method 2: Log into your EZVIZ account via the EZVIZ Studio PC application, tap the device you want to view, and click the "Gallery" at the bottom left corner of the device's live view page, select the time and date to playback.
Method 3: You may insert the SD card into an SD card reader, and use the VS player or EZVIZ MP4 player to view the recordings.
Click here to download the VS player and here to download the EZVIZ MP4 player.
Step 1. Log in to your EZVIZ account, and tap the "Account" page
Step 2. Tap the profile picture at the top of the page
Step 3: Tap Change Password
Step 4: Input the old password and new password you would like to set, and then tap Save to complete the settings
Reminder: If you forget the old password, you may tap Forgot password? on the login page and a 4-digit code would be sent to your registered email or phone number for password reset.
For our 1080p EZVIZ security camera, we estimate that a 16GB MicroSD card will provide approximately 28–32 days of recording under normal use, which is about a total of 1 hour of motion event recordings. Recording time for 720p cameras will be longer.
Follow the steps below to cancel your cloud subscription service - this will avoid auto-renewal charges in the future while still allowing you to enjoy our current paid subscription term.
Step 1: From the Home Page, tap the three-dot icon to enter the Device Settings page
Step 2: Tap "CloudPlay"
Step 3: Tap "Subscription Management" at the bottom
Step 4: Scroll down to tap "Cancel Subscription" at the bottom
Step 5: Tap "Yes" to proceed further
Please note that when the subscription is canceled:
1) There are no refunds/prorated dates
2) Your recording plan will expire when it reaches the end of the subscription period
If the issue remains unresolved, please contact the "EZVIZ support team" for further assistance.
Involved model:C6P/C4S/C2C/C6T/C6C/C3C/C6B/C3A/DB1/C8PF/C3X/C3WN/C3N
EZVIZ Cameras have the option of setting a schedule for alarm notification – this schedule will determine when you want to receive notifications and when you want the alarms turned off.
Here is the step-by-step guide to enable you to perform this task
1. Log into your EZVIZ app
2. Enter device settings > Alarm Notification
3. Enter Set Notification Schedule > tap Add time to add a time segment, repeat the process for all the days you want the schedule to operate
4. Use the check mark on the top right corner to save the schedule
For the settings of the time segment, please note the system is in military time, users cannot overlap the 0:00 mark. For next-day settings, please set 2 different time periods. For example, setting a schedule from 10:00 pm – 8:00 am(Monday – Tuesday), configure the notification schedule settings as thus; Monday 22:00 – Monday 23:59 | Tuesday 0:00 – Tuesday 08:00) Or, tap Repeat and select the day you want to repeat.
5. Once you have completed the scheduling process, exit that page and turn on the notification schedule switch.
Note: You do not have to turn on the main switch for the alarm notification when the system gets to the time segment set. The Alarm notification switch will be enabled and your scheduling will take effect.
Involved model:BC1C/BC1/BM1/BC2/H8c/HB8/EB8/H8/CB3/EB3/CB1
EZVIZ Cameras have the option of setting a schedule for alarm notification – this schedule will determine when you want to receive push notifications to your phone and when you want the alarms turned off.
Here is the step-by-step guide to enable you to perform this task
1. Log into your EZVIZ app
2. Enter device settings > Notification
3. Enable Receive Device Message > EZVIZ App Notification
4. Tap Notification Schedule
5. Tap Customized schedule and then Add Schedule(s) to add a time segment, repeat the process for all the days you want the schedule to operate
6. Tap Save on the top right corner to save the schedule
Note: You do not have to turn on the main switch for the alarm notification when the system gets to the time segment set, the Alarm notification switch will be enabled and your scheduling will take effect.
Step 1: On the Devices page, tap the "+" icon at the top right, then tap "Add Device"
Step 2: Tap the scan icon at the top right or select the device type to add the device
Step 3: On the "Scan QR Code" page, tap the edit icon at the top right, then enter the SN manually to add the device.
**Please make sure you have the correct device serial number and device verification code first!
*Related Articles:
Where to find the EZVIZ device verification code
What should I do when the Wi-Fi connection fails during device pairing?
1. Connect your phone to Wi-Fi or a 4G data plan.
2. Download and install the EZVIZ International app by searching for "EZVIZ" in the App Store (iOS version) and Google Play Store (Android version).
3. Open the EZVIZ mobile app, and register for an EZVIZ user account by tapping "Create New Account" or log in to an existing account.
For this situation, you need to reconfigure the camera by following the steps below:
1. Press and hold the RESET button on your camera for about 5-10 seconds to reset it. This will allow you to start the process of reconnecting the device to the Wi-Fi.
2. Make sure your EZVIZ device is in Wi-Fi configuration mode.
3. Open the EZVIZ mobile app on your smartphone.
4. From the Home page of the app, tap the 3-dot icon next to the name of your camera to enter the Device Settings page.
5. Tap the "Wi-Fi" or "Network Settings>Wi-Fi".
6. Follow the prompts and instructions in the EZVIZ mobile app to enter the new Wi-Fi password to connect your device to your Wi-Fi network again.
Step 1: Log in to your EZVIZ account, tap your profile photo on the top left
Step 2: Enter My Album
Step 3: Tap Edit on the top right corner
Step 4: Then select the files you would like to delete and tap Delete
Alternatively, when you play each file, you would also be able to see the delete icon.
1. Download the EZVIZ APP from the APP Store (IOS) or Google Play (Android) on your phone
2. Open the EZVIZ APP and tap Create New Account
3. Select your region on the top right side, enter your phone number or email address and set your account password, agree to the Terms of service, then tap Continue
4. Verify Account by entering the code in the picture and tap Apply
5. Enter the code sent to your registered email or phone number, the registration is complete and we highly recommend you link your phone number/email as well.
For APP version 6.0.0 and above, starting from 2023-10-15, a maximum of 10 terminals can be used simultaneously. Terminals exceeding 10 and remaining inactive for 3 months will be automatically removed.
If your camera goes offline frequently, below are some troubleshooting steps to resolve the issue for you:
Step 1: Ensure both the firmware and EZVIZ app are running on the latest version.
Step 2: Ensure that your Wi-Fi network signal is good. You can check the signal by connecting your phone to the same WiFi your camera connects to, entering More page > Settings > Device Network Tools > Check WiFi signal.
Step 3: If not good, you can try to move the camera closer to your router, avoid obstacles and interference such as wall, elevator, microwave, washing machines, and Bluetooth devices.
Step 4: If your WiFi router has an adjustable antenna, try pointing it in various directions.
Step 5: Try to change the Wi-Fi channel to a less crowded one.
Step 6: If possible, disconnect some devices you seldom use from your router.
Step 7: If your camera supports Ethernet cable, you can also try to connect it using a cable.
Step 8: If you have two EZVIZ devices and the other one is working fine, you can also try to switch the locations to further determine the issue.
1. Log into your EZVIZ account on the EZVIZ mobile APP.
2. Reset your camera by pressing the reset button for about 10-15 seconds, for some cameras you will hear the voice of "Reset successfully". Then wait for about 1 minute or a few seconds, when you see the indicator light change into red-blue flashing alternately or blue light flashing fast (for some cameras, there is no light change for your reference).
3. Connect your phone to 2.4G wifi only, then tap the "+" button on the home page to scan the QR code which is on the label of the device. You can find a label on the back or bottom of the device.
4. Then follow the instructions on the APP to connect the device to your wifi.
5. After adding the device to your account, you will be able to view your camera(s).
*Please note that one device is only allowed to be added under one account. Please make sure the device has been deleted from another account before you add it.


Notes: Please use EZVIZ App to select Chime Type during DB1 & DB1C setup.
The availability of EZVIZ CloudPlay varies from region to region. For more details, feel free to visit: https://www.ezviz.com/page/cloudplay. You may check your EZVIZ mobile app for the latest information, and you can still choose an SD card and WiFi NVR for local storage.
If you can check alarm notifications on the Event page of the EZVIZ APP but cannot receive push notifications in the background, we recommend using the "Push Self-Check" feature in the EZVIZ APP to assess the situation. To locate it, please open the EZVIZ app, tap "Library" or "Event" at the bottom, access the Settings in the top right corner of the "Library" or "Event" page, select "Push Notification Settings," and choose "Push Self-Check."
Alternatively, below are some detailed troubleshooting steps to resolve the issue for you:
1. Please disable and re-enable the Alarm Notification feature in the EZVIZ APP.
You can enter the Device Settings page > Alarm Notification or the Device Settings page > Notification > (App-side) Receive Device Message > EZVIZ App Notification to do so.
2. Delete any notification schedules you have set before and also make sure that the Notification Schedule button is off.
On the Alarm Notification page, you can tap "Set Notification Schedule” and delete your schedules, then disable the Notification Schedule button. Alternatively, on the Notification page, tap Notification Schedule, enter Customized schedule and clear all the time periods you have set, then go back to select the All time option.
3. Make sure that the "Do Not Disturb" button is turned off on the Event page in the EZVIZ app.
4. If you are still unable to receive push notifications, please check that the push notification permissions for the EZVIZ app are enabled on your mobile device as below:
1) For IOS mobile devices, enter the Settings page of your phone > EZVIZ APP > Notifications > Allow Notifications.
2) For Android mobile devices, enter the Settings page of your phone > APPs > EZVIZ APP. Enable "Appear on top" first, then enter "Notifications" and enable "Show notifications". After that, if you still have other categories, click on all the options in turn, and make sure that the "Show notifications", "Show as pop-up” and "Ignore Do not disturb” features are enabled under each option.
5. There are a few other settings on your phone that you will need to pay attention to as well:
1) Make sure that the EZVIZ app is not blocked if you have anti-virus software stalled on your mobile phone.
2) For IOS mobile devices (above 15), make sure your device is not in Do Not Disturb or Focus mode.
3) For Android devices, make sure that battery optimization for the EZVIZ app is turned off in your phone settings. You may check this by going to phone Settings> Device maintenance > BATTERY > BATTERY Usage > Optimize battery usage > Apps not optimized > All app > turning off EZVIZ switch.
*(Please note that the interface of your phone settings may vary depending on the phone model and version. You may also click here to check the video instructions for reference.)
If you see "Unable to join network EZVIZ_SN" (the SN of your EZVIZ camera) or if you cannot connect to the Device AP during network configuration, we suggest you reset your camera by pressing the reset button for 4-5 seconds and restart the setup procedure.
Before doing so, please make sure that
1. Make sure that you have turned off the cellular data on your phone.
2. Make sure your device is in configuration mode. You can easily tell if the camera is ready by checking if the indicator light flashes blue quickly.
3. When configuring the network, make sure that your EZVIZ device is close to your Wi-Fi router. We recommend that you keep the distance less than 1.5 meters.
If the problem persists, please try the following method:
1. Please check if you can find a Wi-Fi starting with EZVIZ_XXXXXX (the SN of your EZVIZ camera) in the Wi-Fi list of your phone;
2. If yes, please check if you can connect it manually. The password for the device Wi-Fi should be "EZVIZ_verification code" (a 6-digit capital letter code that you can find on the device label). If you're having trouble locating the device verification code, please refer to: Where to find the EZVIZ device verification code?
3. After the connection, go back to the EZVIZ app to complete the network configuration.
If the issue remains unresolved, please contact the “EZVIZ support team” for further assistance.
Step 1: On the login page, input the registered email address or phone number (with the country code) and the correct password
Step 2: Tap Sign In to continue
Note:
If prompted Account username or password error/Login failed, please check:
1 whether the region is correct (in Other Login Methods > Select Region) and whether the account information you input is valid.
2 please confirm the password again or if you forget it, you may tap Forgot Password? on the login page to reset it.
After the installation of all cameras, please continue with the following steps to set up your device:
1.Check your firewall settings or network configurations to prevent any restrictions
2.Connect the DVR/NVR to a router using the Ethernet cable
3.Connect your DVR/NVR to a power source
4.Setup your DVR/NVR using a local monitor
5.Follow the wizard on the local monitor, create a new device password and complete the setup
6.When prompted, log into the EZVIZ app > click on the “plus” tab to add a device > scan the QR code shown on the screen.
If prompted for a password/verification code, input the device password you created for the device during the initial setup. Follow the wizard on your mobile device and complete the setup.
Regarding this, please try the followings and see whether the issue would be resolved:
1. Make sure the volume of your phone itself is turned up and on the system settings of your phone, the notification sound of the EZVIZ app is allowed.
2. Make sure the Message Notification Tone on the EZVIZ app (Library page > Tap the second button on the top right corner > Push Notification Settings > Notification Sound) is not muted.
3. Make sure your phone is not in Do Not Disturb or Focus mode or Silent mode.
4. Turn off battery optimization as battery saver mode may limit some activities to conserve battery life and thus causing this issue.
If the APP prompts "Account username or password error" when you try to log into your account, below are some steps to resolve the issue for you:
Step 1. Please make sure your account information and region are correct.
Step 2. If correct, please ensure you input the correct account password and please be reminded that the password is case-sensitive.
Step 3. Alternatively, you may tap on “Forgot password" on the login page and follow the instructions on the APP to reset a new password and re-sign into your account.
If the issue persists after following the above steps and you need additional assistance, feel free to contact the support team by emailing support@ezviz.com
Please follow the steps below:
Step 1: On the EZVIZ mobile APP, on the Devices page, tap the "+" icon on the top right, then tap "Add Device".
Step 2: Tap the scanning icon on the top right to scan the QR code displayed on your TV.
Step 3: Confirm to sign in to your account.
1) Every EZVIZ device
comes with a factory programmed verification code or Users have to set their
own passwords. For privacy protection, unauthorized users cannot access videos,
playback and images without a verification code.
2) EZVIZ adopts HTTPS in order to protect users' connection to our website. Hypertext Transfer Protocol Secure (HTTPS) is a combination of the Hypertext Transfer Protocol with the SSL/TLS protocol to provide encryption and secure identification of the server.
3) EZVIZ uses end-to-end SSL/TLS encryption to prevent data interception and theft.
4) Only valid emails/phone numbers can be used to register EZVIZ account, EZVIZ implements email/phone number verification by sending verification codes to allow users complete critical account activities, like creating an account, retrieving lost password etc.
Step 1. Log in to your EZVIZ account, and tap the "Account" page
Step 2. Tap the profile picture at the top of the page
Step 3: Tap Log Out at the bottom of the page to log out of the current account
If you want to connect without a network, please follow the steps below:
1. Power on your camera, and make the camera stay WiFi configuration status. For EZVIZ camera, it will enter the WiFi configuration status when the indicator light is red/blue or blue flashing quickly after you power on/reset it.
2. Power on the NVR, then go to the monitor >> right click the mouse to enter Menu >> enter the “Camera Management” >> click “Search” to find the camera you want to add >> click “Add”. After that, the camera will be linked to the X5C and connect X5C’s WiFi, so even if you don’t connect the X5C to the network, you can also view the camera under the LAN on the monitor.
If you want to connect with the network, please follow the steps below:
Method 1:
1. Power on your camera, and make the camera stay WiFi configuration status. For EZVIZ camera, it will enter the WiFi configuration status when the indicator light is red/blue or blue flashing quickly after you power on/reset it.
2. Power on the NVR, then go to the monitor >> right click the mouse to enter Menu >> enter the “Camera Management” >> click “Search” to find the camera you want to add >> click “Add”. After that, the camera will be linked to the X5C.
3. Go to the EZVIZ APP > click on the “plus” tab to add a device > scan the QR code shown on the screen or device label. Follow the wizard on your mobile device and complete the setup.
Method 2(only for EZVIZ camera):
1. Put camera and NVR under the same LAN. Add EZVIZ camera to EZVIZ APP.
2. Add X5C to the EZVIZ APP >> Click model name/SN number to enter the camera link page >> Click “Add a Camera” button and then “Link” button to link camera under the same account and same LAN. Follow the wizard on your mobile device and complete the setup.
If you encounter a squealing sound when you are using the two-way talk feature, please kindly note that the squealing sound you hear is very likely a result of the audio feedback loop between the microphone of the camera and the speaker of your mobile phone, a normal acoustic phenomenon that occurs when a microphone picks up sound from a speaker while that speaker is playing sound from the microphone, thus creating a loop.
To avoid this, please ensure when you use two-way audio:
- there are no interfering objects around the camera such as metal objects, electrical appliances, electronic equipment, etc.
- there is no microphone or other radio equipment near the camera.
- your mobile phone is NOT too close to your EZVIZ device.
Otherwise, the audio feedback loop will create a high-pitched squealing sound.
If you have installed an SD card, but the camera is not recording to it, below are some troubleshooting steps to resolve the issue for you:
1. Try to test by enabling “Alarm Notification” or “Notification” in camera Settings, waving your hand in front of the camera lens until you receive the alarm notification, and then checking whether you could play back the footage to further determine the issue.
2. If no recordings, ensure both the firmware and EZVIZ app are running on the latest version.
3. Ensure the SD card is class 10 or rated at UHS-1. The file format of the SD card should be FAT32 for capacities below 64GB and exFAT for capacities of 64GB and above. (We do recommend you to click https://support.ezviz.com/faq/264 to check the compatibility of your SD card first.)
4. Ensure the installation orientation of the SD card is correct
5. Ensure the SD card is initialized on EZVIZ app before using and the status should be Initialized or Normal. You can check the status in camera settings>Storage Status>Memory Card or camera settings>Record List>Memory Card. If the status shows abnormal or uninitialized, try to format it again through EZVIZ app. (Before formatting, do remember to back up important files.)
6. To further rule out the card issue, you may try to test with a different SD card or install the card in question on a different EZVIZ device.
7. Try to factory reset your camera by holding the Reset button. This will turn the device to the default factory settings and might help resolve minor issues.
If the issue persists after following the above steps and you need additional assistance, feel free to contact the support team by emailing support@ezviz.com or the online chat at the bottom corner. Our team love to help!
EZVIZ develops and applies new technologies to improve product performance and enhance user experience, while ensuring that our practices responsibly and actively contribute to building a safer, better IoT space. With day-to-day persistence and step-by-step progress, EZVIZ continues to improve and go beyond the industry’s requirements for security and reliability.
As smart home technologies evolve and people’s urge for innovations increases, EZVIZ has been moving fast to expand its product portfolio with competitive offerings to meet both market expectations and user demands. To date, a variety of EZVIZ products – including smart home cameras, video doorbells, smart locks, and vacuum cleaners – are equipped with or on the way to integrate AI-powered features to provide advanced smart capabilities, via local AI chips or cloud-assisted technology. These AI features are enabled by secure, productive processing to detect important activities, provide automatic operation, and offer greater convenience. Moreover, users are given options to control and manage the operation of AI features with flexible settings and privacy features in every of them.
The AI technology that we have employed >
- Our AI technology is focused on enhancing the functionality and user experience of our smart home products, always operating within precisely scoped application fields and predefined scenario frameworks.
- Our AI technology, as well as the infrastructure for it such as the cloud platform, are self-developed by EZVIZ’s in-house teams. Although we could adopt some open-source models in the initial stage or may use third-party resources, our AI technology and the relating infrastructure are always designed, managed, and controlled by EZVIZ itself, to ensure that they always and completely align with our principles and practices.
- We firmly believe that the AI technology is just a tool, and users are the only ones who decide whether and how to use this tool. We provide setting options for AI-powered features, allowing users to freely and easily set the usage plan according to their own situation.
- Although some of our AI technologies may involve personal data processing, it is also very common that such use does not involve user’s personal data, such as detection features based on the general shapes of humans, pets and objects. At the same time, most of our AI technologies only run locally on the device, greatly eliminating the possibility of personal data security risks at the initial source.
- Even for AI algorithms that involve cloud-based capabilities, their operation process is strictly defined and firmly controlled -- the users are the only ones who have control over the input and output data of the AI; generally, the input data are those captured by the user’s devices, and the output data are only accessible to the users themselves (and the ones authorized by the users, if any).
- We have never and will not use any data contributed by the users for the purposes without or beyond the user’s authorization. Meanwhile, at EZVIZ, it is strictly prohibited to access user data solely for the purpose of algorithm training.
- We have never been and will never be involved in any business that is unlawful or ethically flawed according to common sense, including but not limited to, the prohibited AI practices under the EU’s AI Act, the fully automated decision-making defined by the EU’s GDPR, and so on.
The principles and rules that we follow to use AI >
- Legal & Ethical Practices: We strictly comply with all applicable laws and regulations, and adhere to widely accepted ethical principles of science and technology.
- Self-controllability: We insist on researching and developing AI technology by ourselves to ensure full-process and completely control.
l Business Necessity: We only use AI when it is clearly necessary to achieve the business purposes that are reasonable and user-friendly.
- Minimal adverseness: We try our best to minimize data involvement and environmental influence.
- Transparency: We disclose our policies and applications to the public through various channels, and conduct user experience research regularly and productively.
- Accountability: We are open to receive supervision from users and the public via email, phone, or other communication channels, with efficient internal mechanisms in place to provide timely responses and continuously improve our practices.
How we conduct AI-related business >
- Clearly define the business purposes (what kind of capability to develop on which/what product) and identify the responsible business owner;
- Thoroughly compare and evaluate the possible ways to achieve the defined purpose from the technical perspective, including the option of device-local or cloud-supported solutions, the type of needed data and their processing, and the verification methods to ensure accuracy and security of the output results;
- Widely consult with relevant professional departments to obtain non- technical input, including but not limited to the Data Protection Officer, Legal and Compliance Department; then carry out the targeted evaluation work, such as the Data Protection Impact Assessment (DPIA), scientific and technological ethical review;
- inalize the business plan based on the assessment of all relevant parties, which should especially pay attention to: Confirming the legal basis for data processing; Practicing privacy protection by implementing “Privacy by Design” and “Privacy by Default”; Building the systematic methods and measures for data security; Establishing ways to safeguard data subjects’ rights and interests;
- Formulate internal management standards to appropriately limit staff activities throughout the design, development and operational management process, develop appropriate access controls, and provide sufficient training and guidance;
- Carry out extensive testing and effective audits to ensure that the actual business activities are fully in line with the purpose for which they were designed, and, in particular, that they do not involve additional data processing beyond the defined scope;
- Closely monitor developments and changes of the relevant factors, including self-checking the laws and regulations, understanding the impact and risks associated with the latest technologies and solutions, and assessing the need to update and improve policies and practices.
How users can manage and control AI features >
For most of the AI-powered features, EZVIZ has developed flexible settings via the EZVIZ App, so that users can choose to enable or disable them at any time via their mobile devices for each applicable product model.
For most activity detection features, users also have the option to adjust the detection sensitivity and customize the detection areas according to their needs. In addition, EZVIZ has introduced many privacy-enhancing features such as the sleep mode, privacy shutter, and no-filming privacy zones, to help users avoid unnecessary or inappropriate detection activities and related video recording.
For more information about EZVIZ’s practices on data security and privacy protection, you can visit the EZVIZ Trust Center.
A quick guide to the AI capabilities that we offer >
*The list may not include all AI features EZVIZ offers as it is subject to change when the EZVIZ products and services are updated.
* Please be aware of the fact and associated risks that the AI technology explained is subject to continuous improvement, and its actual operation may result in inaccuracies. We strongly recommend that you do not rely unconditionally on the AI technology, but rather develop your own method to use it appropriately in different situations.
Currently, the AI capabilities in EZVIZ products are primarily focused on the following areas: enhancing home security, facilitating home routines, and automating preset tasks for a better user experience.
The AI algorithms listed are some typical examples. Their use does not involve the collection or processing of specific data such as specific facial features, physical characteristics, verbal content, etc. Meanwhile, although the EZVIZ products that use these algorithms are produced by us, EZVIZ will NEVER participate in the processing of data resulting from the running of the algorithm, unless it is specifically agreed by the user and is necessary to provide the service specified by the user.
|
Main Category |
AI Feature |
Quick
explanation on the involved algorithm/data |
|
AI
Features for Activity Detection Purposes |
Human Shape Detection |
The local AI chip will help the camera
detect human-shape-alike objects in its viewing angle, which may be a moving
rectangular object within a height of 1.5 to 2 meters that is no further than
10 to 15 meters away from the camera. This does not involve the recognition,
analysis or processing of any facial features or other bio-sensitive data of
individual people. |
|
Vehicle Shape Detection |
The local AI chip will help the camera
detect car-like moving objects that match general car sizes and shapes, at a
distance of no further than 15 meters away from the camera. The standard
vehicle shape detection feature does not involve the license plate
recognition or related image processing. |
|
|
Pet Detection |
The local AI chip will help the camera
detect pet-like moving objects in its viewing angle at a distance of 3 to 5
meters. Currently this feature mainly works for commonly seen cats and dogs,
and is not able to recognize and identify individual animals. |
|
|
Two-Way Calling by Waving a Hand /
Posing a Victory Sign (Gesture Recognition) |
The local AI chip will help the camera
detect the waving hand of a person or the gesture of the victory sign in
front of the camera. Once the detection happens successfully, the device will
automatically initiate a video call to the user’s EZVIZ App (It may be
phrased as Gesture Recognition in your EZVIZ App on different product pages,
but currently this feature only detects a waving hand or a victory sign instead
of any other hand gestures). |
|
|
Loud
Noise Detection (Abnormal Sound Sensing) |
The local AI chip will help the camera detect
sudden sound activities based on the noise level within its detection range
by using the built-in microphone. (It may be phrased as Abnormal Sound
Sensing in your EZVIZ App on different product pages). It does not involve
processing or analysis on any specific verbal content. |
|
|
Bark & Meow Detection |
Based on the regular loud noise
detection algorithm, the local AI chip will help the camera detect the sounds
that have similar sound waves to dogs barking and cat meowing in the
monitored environment within the audio detection range. |
|
|
Crying Detection |
Based on the regular loud noise
detection algorithm, the local AI chip will help the camera detect the sounds
that have similar sound waves to baby crying in the monitored environment
within the audio detection range. |
|
|
Package Detection |
The local AI chip will help the camera
detect objects that are similar in shape and size to commonly seen, standard
delivery boxes within its detection range. It is not able to detect or read
any written information on the package boxes. |
|
|
License Plate Recognition |
The local AI chip will help the camera
detect license plates within its viewing angle and detection distance, and extracts visible
numbers and letters from the detected image with an instant alert. This
feature operates locally and is designed for private use only, such as in
personal driveways or parking areas. |
|
|
AI Features for Verification
Purposes |
Facial Recognition (For unlocking functions) |
EZVIZ currently offers several models
of smart locks and smart video doorphones that support facial recognition to enable
users to open their doors or gates with fast and secure identity
verification. By integrating a local high-performance AI chip and 3D
structured light technology, these products generate 3D facial modeling data
after the users choose to enable such function and follow the instruction to
add their facial information. The entire verification and unlocking process
is completed locally on the device's AI chip. No actual photos of human faces
are stored or shared in any means, and all 3D modeling data are strictly
protected and stored locally. |
|
Palm Vein Recognition (For unlocking functions) |
EZVIZ currently offers several
models of smart locks and smart video doorphones that support palm vein
recognition to provide a keyless, secure unlocking experience. By using a
local AI chip and near-infrared light, the supported products generate a set
of 3D modeling data based on the vein patterns after the users choose to
enable such function and follow the instruction to add their palm vein
information. The entire verification and unlocking process is completed
locally on the device's AI chip. No actual photos of human palms are stored
or shared in any means, and all 3D modeling data are strictly protected and
stored locally. |
|
|
AI
Features for Robotic Operation Purposes |
Advanced Obstacle Avoidance |
Together with the use of LDS LiDAR and structured
light, the local AI chip on the robot will help detect and identify various
common obstacles and objects found in its working environment during the
cleaning process. When an obstacle is detected, the robot will smartly plan
its moving path to avoid bumping into it or getting stuck. Some common
obstacles will be displayed on the robot’s cleaning map with special icons,
after user choose to enable such function. |
|
Carpet Detection |
The local AI chip will work with the
material sensors to detect carpeted areas during the cleaning process, so as
to adjust cleaning modes automatically for these areas. The carpeted areas
will also be marked on the robot’s cleaning map. |
|
|
Smart Liquid Stain Detection |
The local AI chip will help the robot
detect spilled liquids or stains on the floor during the cleaning process.
When liquid stains are detected, the robot will automatically perform a
special set of actions to remove the stains more effectively to achieve
better cleaning results. This feature is disabled by default and must be
manually enabled by users before use. |
|
|
AI Task Automation |
The local AI chip will help the robot
automatically generate a set of optimized cleaning parameters based on
different room types, so as to perform automatic cleaning missions with
customized cleaning modes and enhanced cleaning efficiency. This feature is
disabled by default and must be manually enabled by users before use. |
|
|
Enhanced
Cleaning Performance for Large Particles |
Supported by the local AI chip, the
robot will automatically reduce the sweeping speed of the side brush and
auto-boost its suction power when detecting large particles, so as to provide
a more tailored cleaning strategy. This feature is disabled by default and
must be manually enabled by users before use. |
If you see the "Incorrect device Wi-Fi password" prompt when you connect to the device Wi-Fi during network setup, please follow these steps to see if they help:
1. go to your phone settings and find Wi-Fi settings.
2. locate the device Wi-Fi which is named EZVIZ_SN (the SN of your camera, for example, EZVIZ_D12345678).
3. forget or delete the device Wi-Fi from your Wi-iFi list and then reconnect it by manually inputting the password, which is EZVIZ_verification code (for example, if the 6 capital letters verification code on the device label is ABCDEF, the password should be EZVIZ_ABCDEF).
4. after connection, go back to the EZVIZ app to retry.
To reset the password, please follow below steps first:
1. Please ensure the device is online, and hover your mouse to the top of the screen and click on "device management"
2. When prompted, click on “Forgot Password” on the monitor
3. After this, a verification code for password reset would be sent to your registered email address or phone number
4. Input the code and follow the onscreen prompt, you would be able to reset your DVR/NVR
However, if you are unable to reset password through above method, for user privacy and device safety, it is required to contact us via the account your device linked to. Thus, please make sure you send us the long serial number or the GUID file by following below steps through the linked account.
1. Remove the Ethernet cable connected to your DVR/NVR and reboot your device
2. Hover your mouse to the top of the screen and click on "device management"
3. When prompted, click on “Forgot Password” on the monitor - You will be prompted to call EZVIZ, click on "OK" and you will arrive at the screen where either you have the long serial number or it will ask you to download the GUID file using USB drive.
4. If long serial number, please take a clear picture with the time and date on your monitor visible and send it to us
5. If GUID file, please insert a USB drive into the USB slot on the unit > Click the "Export" button to export the GUID file to the USB > attach the GUID file in the reply to this email
After verification, we will send the secure code to you as soon as we can.
You may also click here to view our FAQ video for the detailed instructions mentioned above and we hope this will help.
EZVIZ offers a wide range of smart home products for various application scenarios on the global market. Due to the variety of product functions, use cases and target markets, the EOL policy may vary for the reasons mentioned. We strictly adhere to applicable local laws and regulations regarding product EOL policies and make the necessary adjustments to ensure reasonable and responsible use of our products.
To ensure that our users are better informed about the product life cycle with the expected firmware maintenance time, we regularly update this page with information about the latest supported firmware versions of our models. Please note that the list includes both EOL products and currently active products with an expected EOL date.
● About EZVIZ’s EOL (End-Of-Life) products: It means that EZVIZ no longer maintain any firmware updates (including security updates) for them, and may no longer respond to security vulnerability reports for such products either.
● About product usage according to the EOL dates: Discontinuation of firmware updates does not mean that the basic features of the product are no longer available, unless otherwise specified. For example, the product can still be connected to the EZVIZ App for use, while the performance of certain functions failed to update may be affected. Meanwhile, EZVIZ will continue to provide after-sales service for any hardware issues with the product as long as it is still supported by the warranty policy.
This page will be updated on a regular basis. Please keep an eye on the changes to obtain the latest list. If you have any questions, please feel free to contact us at www.ezviz.com/page/contact-us.
● List of Products with Expected EOL Dates (only partial products included)
| Product line | Model | Targeted Area | Day of firmware update cessation |
| Action Camera | CS-SP206-A0-54WFBS | Europe | 2019/12/31 |
| Action Camera | CS-SP208-A0-212WFBS | Europe | 2019/12/31 |
| Action Camera | CS-SP206-B0-68WFBS | Europe | 2021/12/31 |
| Action Camera | CS-SP206-C0-68WFBS | Europe | 2021/12/31 |
| Action Camera | CS-SP208-B0-6C12WFBS | Europe | 2021/12/31 |
| Home Sensors | CS-T6-A | Europe | 2021/12/31 |
| Home Networking | CS-W2D-B2-EUP | Europe | 2021/12/31 |
| Home Networking | CS-W2D-B3-EUP | Europe | 2021/12/31 |
| Home Sensors | CS-T1-C/12M | Europe | 2022/12/31 |
| Home Sensors | CS-T4-B | Europe | 2022/12/31 |
| Home Sensors | CS-K2-A | Europe | 2022/12/31 |
| Home Sensors | CS-K3-A | Europe | 2022/12/31 |
| Home Sensors | CS-T10-A | Europe | 2022/12/31 |
| Home Sensors | CS-T2-A | Europe | 2022/12/31 |
| Home Sensors | CS-T5-A | Europe | 2022/12/31 |
| Home Sensors | CS-T8-A/CH4 | Europe | 2022/12/31 |
| Home Sensors | CS-T9-A | Europe | 2022/12/31 |
| Home Networking | CS-W2D-EUP | Europe | 2022/12/31 |
| Home Networking | CS-W2S-EUP | Europe | 2022/12/31 |
| Home Networking | CS-W2S-UK | Europe | 2022/12/31 |
| Home Networking | CS-W5S-A0-MT1200GP | Europe | 2022/12/31 |
| Smart Home Camera | CS-CV210-A0-52EFR(4mm) | Europe | 2023/12/31 |
| Smart Home Camera | CS-CV210-A0-52WFR(4mm) | Europe | 2023/12/31 |
| Smart Home Camera | CS-CV216-A0-31EFR(2.8mm) | Europe | 2023/12/31 |
| Smart Home Camera | CS-CV216-A0-31EFR(4mm) | Europe | 2023/12/31 |
| Smart Home Camera | CS-CV216-A0-31WFR(2.8mm) | Europe | 2023/12/31 |
| Smart Home Camera | CS-CV216-A0-31WFR(4mm) | Europe | 2023/12/31 |
| Smart Home Camera | CS-CV216-A0-3B1WFR(2.8mm) | Europe | 2023/12/31 |
| Smart Home Camera | CS-CV216-A0-3B1WFR(4mm) | Europe | 2023/12/31 |
| Smart Home Camera | CS-CV220-A0-52WFR(4mm) | Europe | 2023/12/31 |
| Smart Home Camera | CS-CV240-B0-21WFR | Europe | 2023/12/31 |
| Smart Home Camera | CS-CV248-A0-32WFR | Europe | 2023/12/31 |
| Smart Home Camera | CS-CV310-B0-1B2WR(4mm) | Europe | 2023/12/31 |
| Smart Home Camera | CS-CV310-B0-1B2WR(6mm) | Europe | 2023/12/31 |
| Smart Home Camera | CS-CV310-B0-3B1ER(6mm) | Europe | 2023/12/31 |
| Smart Home Camera | CS-CV310-B0-3B1WR(2.8mm) | Europe | 2023/12/31 |
| Smart Home Camera | CS-CV310-B0-3B1WR(4mm) | Europe | 2023/12/31 |
| Smart Home Camera | CS-CV310-B0-3B1WR(6mm) | Europe | 2023/12/31 |
| Home Networking | CS-W3C-WD1200G | Europe | 2023/12/31 |
| Router | CS-W3-WD1200G-EUP | Europe | 2023/12/31 |
| Home Networking | CS-W6-SD05G | Europe | 2023/12/31 |
| Switch | CS-W6-SD05GP | Europe | 2023/12/31 |
| Home Networking | CS-W6-SD09G | Europe | 2023/12/31 |
| Home Networking | CS-W6-SD09GP | Europe | 2023/12/31 |
| NVR | CS-X5C-4APEC | Europe | 2023/12/31 |
| NVR | CS-X5C-4APEC/1T | Europe | 2023/12/31 |
| NVR | CS-X5C-4APEC-B/1T | Europe | 2023/12/31 |
| NVR | CS-X5C-4EU | Europe | 2023/12/31 |
| NVR | CS-X5C-4EU/1T | Europe | 2023/12/31 |
| NVR | CS-X5C-4EU-B/1T | Europe | 2023/12/31 |
| NVR | CS-X5C-4EU-B/2T | Europe | 2023/12/31 |
| NVR | CS-X5C-4US-B/1T | Europe | 2023/12/31 |
| NVR | CS-X5C-8APEC | Europe | 2023/12/31 |
| NVR | CS-X5C-8APEC/1T | Europe | 2023/12/31 |
| NVR | CS-X5C-8APEC-B/1T | Europe | 2023/12/31 |
| NVR | CS-X5C-8EU | Europe | 2023/12/31 |
| NVR | CS-X5C-8EU/1T | Europe | 2023/12/31 |
| NVR | CS-X5C-8EU-B/1T | Europe | 2023/12/31 |
| NVR | CS-X5C-8EU-B/2T | Europe | 2023/12/31 |
| NVR | CS-X5C-8US | Europe | 2023/12/31 |
| NVR | CS-X5C-8US-B/1T | Europe | 2023/12/31 |
| NVR | CS-X5S-16H | Europe | 2023/12/31 |
| NVR | CS-X5S-16L2 | Europe | 2023/12/31 |
| NVR | CS-X5S-4PEUP | Europe | 2023/12/31 |
| NVR | CS-X5S-4W | Europe | 2023/12/31 |
| NVR | CS-X5S-4W-B | Europe | 2023/12/31 |
| NVR | CS-X5S-4W-B/1T | Europe | 2023/12/31 |
| NVR | CS-X5S-8PEUP | Europe | 2023/12/31 |
| NVR | CS-X5S-8W | Europe | 2023/12/31 |
| NVR | CS-X5S-8W-B | Europe | 2023/12/31 |
| NVR | CS-X5S-8W-B/1T | Europe | 2023/12/31 |
| Smart Home Camera | CS-CV200-A0-52WFR | Europe | 2024/12/31 |
| Smart Home Camera | CS-CV206-A0-1B2W2FR | Europe | 2024/12/31 |
| Smart Home Camera | CS-CV206-C0-3B2WFR | Europe | 2024/12/31 |
| Smart Home Camera | CS-CV246-A0-3B1WFR | Europe | 2024/12/31 |
| Smart Home Camera | CS-CV246-B0-3B2WFR | Europe | 2024/12/31 |
| Smart Home Camera | CS-CV310-A0-3B1WFR(2.8mm) | Europe | 2024/12/31 |
| Smart Home Camera | CS-CV310-A0-3B1WFR(4mm) | Europe | 2024/12/31 |
| Smart Home Camera | CS-CV310-A0-3B1WFR(6mm) | Europe | 2024/12/31 |
| Smart Home Camera | CS-CV310-B0-3B1ER(2.8mm) | Europe | 2024/12/31 |
| Smart Home Camera | CS-CV310-B0-3B1ER(4mm) | Europe | 2024/12/31 |
| Smart Home Camera | CS-CV310-A0-1C2WFR-C(4mm) | Europe | 2025/12/31 |
| Smart Home Camera | CS-C2mini-31WFR | Europe | 2025/12/31 |
| Smart Home Camera | CS-CV206-C0-1A1WFR | Europe | 2025/12/31 |
| Smart Home Camera | CS-CV206-E0-1D1WF | Europe | 2025/12/31 |
| Smart Home Camera | CS-CV228-A0-3C2WFR(2.8mm) | Europe | 2025/12/31 |
| Smart Home Camera | CS-CV228-A0-3C2WFR(4mm) | Europe | 2025/12/31 |
| Smart Home Camera | CS-CV246-A0-1C2WFR | Europe | 2025/12/31 |
| Smart Home Camera | CS-CV248-B0-32WFR | Europe | 2025/12/31 |
| Smart Home Camera | CS-CV248-B0-32WMFR(868MHz) | Europe | 2025/12/31 |
| Smart Home Camera | CS-CV310-A0-1B2WFR(2.8mm) | Europe | 2025/12/31 |
| Smart Home Camera | CS-CV310-A0-1B2WFR(4mm) | Europe | 2025/12/31 |
| Smart Home Camera | CS-CV310-A0-1B2WFR(6mm) | Europe | 2025/12/31 |
| Smart Home Camera | CS-CV310-A0-1C2WFR(2.8mm) | Europe | 2025/12/31 |
| Smart Home Camera | CS-CV310-A0-1C2WFR(4mm) | Europe | 2025/12/31 |
| Smart Home Camera | CS-CV310-A0-1C2WFR-C(2.8mm) | Europe | 2025/12/31 |
| Smart Home Camera | CS-C6Wi-A0-3E4WF | Europe | 2026/12/31 |
| Smart Home Camera | CS-CV346-A0-7A3WFR | Europe | 2026/12/31 |
| Smart Home Camera | CS-DB2-A0-1B3WPMFBR | Europe | 2026/12/31 |
| Smart Home Camera | CS-DP1-A0-4A1WPFBSR | Europe | 2026/12/31 |
| Smart Home Camera | CS-C3N-A0-3H2WFRL(2.8mm) | Europe | 2027/12/31 |
| Smart Home Camera | CS-C3W-A0-3H4WFRL(2.8mm) | Europe | 2027/12/31 |
| Smart Home Camera | CS-C6N-A0-1C2WFR | Europe | 2027/12/31 |
| Smart Home Camera | CS-C1C-D0-1D1WFR | Europe | 2027/12/31 |
| Smart Home Camera | CS-C1C-D0-1D2WFR | Europe | 2027/12/31 |
| Smart Home Camera | CS-C1C-D0-1D2WPFR | Europe | 2027/12/31 |
| Smart Home Camera | CS-C1HC-D0-1D1WFR | Europe | 2027/12/31 |
| Smart Home Camera | CS-C1HC-D0-1D2WFR | Europe | 2027/12/31 |
| Smart Home Camera | CS-C1HC-E0-1E2WF | Europe | 2027/12/31 |
| Smart Home Camera | CS-C3A-A0-1C2WPMFBR(868MHz) | Europe | 2027/12/31 |
| Smart Home Camera | CS-C3N-A0-3H2WFRL(4mm) | Europe | 2027/12/31 |
| Smart Home Camera | CS-C3W-A0-3H2WFL(4mm) | Europe | 2027/12/31 |
| Smart Home Camera | CS-C3W-A0-3H4WFRL(4mm) | Europe | 2027/12/31 |
| Smart Home Camera | CS-C6CN-A0-3H2WF | Europe | 2027/12/31 |
| Smart Home Camera | CS-C8C-A0-3H2WFL1(4mm) | Europe | 2027/12/31 |
| Smart Home Camera | CS-C8C-A0-3H2WFL1(6mm) | Europe | 2027/12/31 |
| Smart Home Camera | CS-CV206-D0-1G1WF | Europe | 2027/12/31 |
| Smart Home Camera | CS-CV310-A0-3C2WFRL(2.8mm) | Europe | 2027/12/31 |
| Smart Home Camera | CS-CV310-A0-3C2WFRL(4mm) | Europe | 2027/12/31 |
| Smart Home Camera | CS-CV310-B0-1B2ER(2.8mm) | Europe | 2027/12/31 |
| Smart Home Camera | CS-CV310-B0-1B2ER(4mm) | Europe | 2027/12/31 |
| Smart Home Camera | CS-CV310-B0-1B2ER(6mm) | Europe | 2027/12/31 |
| Smart Home Camera | CS-CV310-B0-1B2WR(2.8mm) | Europe | 2027/12/31 |
| Smart Home Camera | CS-DP1C-A0-4A1WPFBSR | Europe | 2027/12/31 |
| Home Sensors | CS-T1C-A0-BG | Europe | 2028/1/20 |
| Home Sensors | CS-T2C-A0-BG | Europe | 2028/1/20 |
| Home Sensors | CS-T3C-A0-BG | Europe | 2028/1/20 |
| Home Sensors | CS-T10C-A0-BG | Europe | 2028/7/28 |
| Home Sensors | CS-T51C-A0-BG | Europe | 2028/10/31 |
| Smart Home Camera | CS-C3W-A0-3H2WFL(2.8mm) | Europe | 2028/12/31 |
| Smart Home Camera | CS-C6N-C0-2C2WF | Europe | 2028/12/31 |
| Smart Home Camera | CS-LC1-A0-1B2WPFRL(2.8mm) | Europe | 2028/12/31 |
| Home Sensors | CS-T4C-A0-BG | Europe | 2029/3/3 |
| Smart Home Camera | CS-C3W-A0-1F4WFL | Europe | 2029/4/22 |
| Home Sensors | CS-T9C-A0-BG | Europe | 2029/6/1 |
| Smart Home Camera | CS-C1C-F0-1E2WF | Europe | 2029/8/2 |
| Smart Home Camera | CS-BC1C-A0-2C4WPBDL | Europe | 2029/8/16 |
| Smart Home Camera | CS-C6-A0-8C4WF(4mm) | Europe | 2029/9/29 |
| Smart Video Doorbell | CS-DB1C-A0-1E2W2FR | Europe | 2029/12/1 |
| Home Sensors | CS-T55-R100-G | Europe | 2029/12/26 |
| Smart Home Camera | CS-BC1-B3-B0 | Europe | 2029/12/31 |
| Smart Home Camera | CS-BC1C-A0-2C2WPBDL | Europe | 2029/12/31 |
| Smart Home Camera | CS-C1C-E0-1E2WF | Europe | 2029/12/31 |
| Smart Home Camera | CS-C1T-A0-1D2WF | Europe | 2029/12/31 |
| Smart Home Camera | CS-C2C-A0-1E2WF | Europe | 2029/12/31 |
| Smart Home Camera | CS-C3A-B0-1C2WPMFBR(868MHz) | Europe | 2029/12/31 |
| Smart Home Camera | CS-C3N-A0-3G2WFL1(2.8mm) | Europe | 2029/12/31 |
| Smart Home Camera | CS-C3TN-A0-1H2WF | Europe | 2029/12/31 |
| Smart Home Camera | CS-C3TN-A0-1H2WF(2.8mm) | Europe | 2029/12/31 |
| Smart Home Camera | CS-C3TN-A0-1H2WFL(2.8mm) | Europe | 2029/12/31 |
| Smart Home Camera | CS-C3TN-A0-1H3WKFL(2.8mm) | Europe | 2029/12/31 |
| Smart Home Camera | CS-C3TN-A0-1H3WKFL-B(2.8mm) | Europe | 2029/12/31 |
| Smart Home Camera | CS-C3W-A0-1H2WKFL(2.8mm) | Europe | 2029/12/31 |
| Smart Home Camera | CS-C3W-A0-1H2WKFL(4mm) | Europe | 2029/12/31 |
| Smart Entry | CS-DB2C-A0-1E3WPBR | Europe | 2029/12/31 |
| Smart Entry | CS-DP2-A0-6E2WPFBS | Europe | 2029/12/31 |
| Smart Home Camera | CS-EB3-R105-2C3WFL(Type-C) | Europe | 2029/12/31 |
| Home Gateway | CS-A1-32W | Europe | 2029/12/31 |
| Smart Home Camera | CS-BC1-A0-2C4WPBL | Europe | 2029/12/31 |
| Smart Home Camera | CS-BC1-B0-2C2WPBL | Europe | 2029/12/31 |
| Smart Home Camera | CS-BC1-B3(4MP,W1) | Europe | 2029/12/31 |
| Smart Home Camera | CS-BC1C/SP(2MP) | Europe | 2029/12/31 |
| Smart Home Camera | CS-BC1C-B0-2C2WPBDL | Europe | 2029/12/31 |
| Smart Home Camera | CS-C1C-E0-1G1WF | Europe | 2029/12/31 |
| Smart Home Camera | CS-C1HC-E0-1G1WF | Europe | 2029/12/31 |
| Smart Home Camera | CS-C3N-A0-3G2WFL1(4mm) | Europe | 2029/12/31 |
| Robot Vacuum Cleaner | CS-RE4CP-YWT2 | Europe | 2029/12/31 |
| Robot Vacuum Cleaner | CS-RE4CP-YWT5 | Europe | 2029/12/31 |
| Robot Vacuum Cleaner | CS-RE4C-YWT2 | Europe | 2029/12/31 |
| Robot Vacuum Cleaner | CS-RE4C-YWT5 | Europe | 2029/12/31 |
| Robot Vacuum Cleaner | CS-RE4-PBT2 | Europe | 2029/12/31 |
| Robot Vacuum Cleaner | CS-RE4-PBT5 | Europe | 2029/12/31 |
| Robot Vacuum Cleaner | CS-RE4P-PBT2 | Europe | 2029/12/31 |
| Robot Vacuum Cleaner | CS-RE4P-PBT5 | Europe | 2029/12/31 |
| Robot Vacuum Cleaner | CS-RE4P-PWT2 | Europe | 2029/12/31 |
| Robot Vacuum Cleaner | CS-RE4P-PWT5 | Europe | 2029/12/31 |
| Robot Vacuum Cleaner | CS-RE4P-PWT9 | Europe | 2029/12/31 |
| Robot Vacuum Cleaner | CS-RE4-PWT2 | Europe | 2029/12/31 |
| Robot Vacuum Cleaner | CS-RE4-PWT5 | Europe | 2029/12/31 |
| Robot Vacuum Cleaner | CS-RE4-PWT9 | Europe | 2029/12/31 |
| Robot Vacuum Cleaner | CS-RE5P-TWT2 | Europe | 2029/12/31 |
| Robot Vacuum Cleaner | CS-RE5P-TWT5 | Europe | 2029/12/31 |
| Robot Vacuum Cleaner | CS-RE5P-TWT9 | Europe | 2029/12/31 |
| Robot Vacuum Cleaner | CS-RE5SP-TWT2 | Europe | 2029/12/31 |
| Robot Vacuum Cleaner | CS-RE5SP-TWT5 | Europe | 2029/12/31 |
| Robot Vacuum Cleaner | CS-RE5S-TWT2 | Europe | 2029/12/31 |
| Robot Vacuum Cleaner | CS-RE5S-TWT5 | Europe | 2029/12/31 |
| Robot Vacuum Cleaner | CS-RE5-TWT2 | Europe | 2029/12/31 |
| Robot Vacuum Cleaner | CS-RE5-TWT5 | Europe | 2029/12/31 |
| Robot Vacuum Cleaner | CS-RE5-TWT9 | Europe | 2029/12/31 |
| Robot Vacuum Cleaner | CS-RS20-PRO-PGA2 | Europe | 2029/12/31 |
| Robot Vacuum Cleaner | CS-RS20-PRO-PGA5 | Europe | 2029/12/31 |
| Robot Vacuum Cleaner | CS-RS20-PRO-SGA2 | Europe | 2029/12/31 |
| Robot Vacuum Cleaner | CS-RS20-PRO-TGA2 | Europe | 2029/12/31 |
| Robot Vacuum Cleaner | CS-RS20-PRO-TGA5 | Europe | 2029/12/31 |
| Robot Vacuum Cleaner | CS-RS20-PRO-UGA2 | Europe | 2029/12/31 |
| Robot Vacuum Cleaner | CS-RS2-TWT2 | Europe | 2029/12/31 |
| Robot Vacuum Cleaner | CS-RS2-TWT5 | Europe | 2029/12/31 |
| Home Gateway | CS-A3-A0-W | Europe | 2030/1/20 |
| Smart Entry | CS-L2S-11FCP-A0 | Europe | 2030/4/8 |
| Smart Entry | CS-DL01S-0ZBTA | Europe | 2030/11/10 |
| Smart Video Doorbell | CS-CMT-B0-CHIME | Europe | 2030/12/31 |
| Smart Video Doorbell | CS-DL01CP-BT | Europe | 2030/12/31 |
| Smart Video Doorbell | CS-DL01P-BT | Europe | 2030/12/31 |
| Smart Home Camera | CS-EB3-R100-2C3WFL | Europe | 2030/12/31 |
| Smart Home Camera | CS-H6c-R101-1G2WF | Europe | 2030/12/31 |
| Smart Home Camera | CS-C1HC-F0-1E2WF | Europe | 2030/12/31 |
| Smart Home Camera | CS-C3W-R100-1F4WKFL | Europe | 2030/12/31 |
| Smart Home Camera | CS-C6N-B0-1G2WF | Europe | 2030/12/31 |
| Smart Home Camera | CS-C6N-D0-2C3WF | Europe | 2030/12/31 |
| Smart Home Camera | CS-C6N-D0-8B4WF | Europe | 2030/12/31 |
| Smart Home Camera | CS-C8C-A0-1F2WF | Europe | 2030/12/31 |
| Smart Home Camera | CS-C8C-A0-1F2WFL1 | Europe | 2030/12/31 |
| Smart Home Camera | CS-C8c-R100-1J4WKFL | Europe | 2030/12/31 |
| Smart Home Camera | CS-C8c-R100-1J5WKFL | Europe | 2030/12/31 |
| Smart Home Camera | CS-C8PF-A0-6E22WFR | Europe | 2030/12/31 |
| Smart Home Camera | CS-C8W-A0-1H3WKFL | Europe | 2030/12/31 |
| Smart Home Camera | CS-CB8-R105-2C3WFL | Europe | 2030/12/31 |
| Smart Video Doorbell | CS-CMT-A0-CHIME | Europe | 2030/12/31 |
| Smart Home Camera | CS-CP1-A0-2C3WF | Europe | 2030/12/31 |
| Smart Home Camera | CS-CP1-A0-8B4WF | Europe | 2030/12/31 |
| Smart Home Camera | CS-CV206-D0-1E2WFR | Europe | 2030/12/31 |
| Smart Video Doorbell | CS-DB1-B0-1J5W2FR | Europe | 2030/12/31 |
| Smart Entry | CS-DL01/DL01CP/A3-BK | Europe | 2030/12/31 |
| Smart Entry | CS-DL01/DL01CP-BK | Europe | 2030/12/31 |
| Smart Entry | CS-DL01-R200-ZB-BK | Europe | 2030/12/31 |
| Smart Entry | CS-DL01S/DL01CP/A3-BK | Europe | 2030/12/31 |
| Smart Entry | CS-DL01S/DL01CP-BK | Europe | 2030/12/31 |
| Smart Entry | CS-DL01S-0ZBTA-Bk | Europe | 2030/12/31 |
| Smart Home Camera | CS-H3c-R100-1J4WKFL | Europe | 2030/12/31 |
| Smart Home Camera | CS-H3c-R100-1K2WF | Europe | 2030/12/31 |
| Smart Home Camera | CS-H3c-R100-1K2WFL | Europe | 2030/12/31 |
| Smart Home Camera | CS-H3-R100-1H3WKFL | Europe | 2030/12/31 |
| Smart Home Camera | CS-H3-R100-1J5WKFL | Europe | 2030/12/31 |
| Smart Home Camera | CS-H6c-R100-8B4WF | Europe | 2030/12/31 |
| Smart Home Camera | CS-H6c-R103-8B4WF | Europe | 2030/12/31 |
| Smart Home Camera | CS-H6-R100-1J4WF | Europe | 2030/12/31 |
| Smart Home Camera | CS-H8c-R100-1K2WKFL | Europe | 2030/12/31 |
| Smart Home Camera | CS-H8c-R200-1K3EKFL | Europe | 2030/12/31 |
| Smart Home Camera | CS-HB3-R100-2C3HL | Europe | 2030/12/31 |
| Smart Home Camera | CS-HB3-R105-2C3HL | Europe | 2030/12/31 |
| Smart Home Camera | CS-HB8-R105-2C4WDL | Europe | 2030/12/31 |
| Smart Entry | CS-L2-11FCP | Europe | 2030/12/31 |
| Smart Entry | CS-L2S-11FCP | Europe | 2030/12/31 |
| Smart Entry | CS-L2S-R200-11FCP | Europe | 2030/12/31 |
| Smart Home Camera | CS-LC1C-A0-1F2WPFRL | Europe | 2030/12/31 |
| Smart Home Camera | CS-LC3-A0-8B4WDL | Europe | 2030/12/31 |
| Router | CS-RT1-R100-1G2G | Europe | 2030/12/31 |
| Router | CS-RT1-R100-1G8G | Europe | 2030/12/31 |
| Smart Control | CS-T31-16A-EU | Europe | 2030/12/31 |
| Smart Control | CS-T31-16A-UK | Europe | 2030/12/31 |
| Smart Control | CS-T31-16B-EU | Europe | 2030/12/31 |
| Smart Control | CS-T31-16B-UK | Europe | 2030/12/31 |
| Smart Home Camera | CS-TY1-C0-8B4WF | Europe | 2030/12/31 |
| Smart Home Camera | CS-TY2-B0-1G2WF | Europe | 2030/12/31 |
| Smart Home Camera | CS-TY2-R101-1G2WF | Europe | 2030/12/31 |
| Router | CS-W3R-R100-X1G8GM | Europe | 2030/12/31 |
| Smart Video Doorbell | CS-CP4-R100-6E2WPFBS | Europe | 2031/1/12 |
| Smart Video Doorbell | CS-CH1-A0-10AWFK | Europe | 2031/8/5 |
| Smart Video Doorbell | CS-CH1-R100-10AWFK | Europe | 2031/8/5 |
| Smart Video Doorbell | CS-DB2-A0-2C5WPBR-B | Europe | 2031/8/6 |
| Home Gateway | CS-A3-R200-WBG | Europe | 2031/12/31 |
| Smart Home Camera | CS-H6c-R105-1L2WF | Europe | 2031/12/31 |
| Smart Home Camera | CS-BC1c-R100-2F8WFL | Europe | 2031/12/31 |
| Smart Home Camera | CS-C2C-B0-1E2WF | Europe | 2031/12/31 |
| Smart Home Camera | CS-C6-A0-8C4WF | Europe | 2031/12/31 |
| Smart Home Camera | CS-C6CN-R100-8B4WF | Europe | 2031/12/31 |
| Smart Home Camera | CS-C6c-R100-1H3WF | Europe | 2031/12/31 |
| Smart Home Camera | CS-C8c-R100-8H8WKFL | Europe | 2031/12/31 |
| Smart Home Camera | CS-C8W-A0-1J5WKFL | Europe | 2031/12/31 |
| Smart Home Camera | CS-C90-R100-8H44WKFL | Europe | 2031/12/31 |
| Smart Home Camera | CS-CB8-R100-2C3WFL | Europe | 2031/12/31 |
| Smart Home Camera | CS-CV310-C0-6B22WFR | Europe | 2031/12/31 |
| Smart Video Doorbell | CS-DB1-A0-1B3WPFR | Europe | 2031/12/31 |
| Smart Home Camera | CS-H3c-R100-1J5WKFL | Europe | 2031/12/31 |
| Smart Home Camera | CS-H3c-R100-1K3WKFL | Europe | 2031/12/31 |
| Smart Home Camera | CS-H4-R201-1H3EKFL | Europe | 2031/12/31 |
| Smart Home Camera | CS-H4-R201-1H3WKFL | Europe | 2031/12/31 |
| Smart Home Camera | CS-H5-R201-1H3EKFL | Europe | 2031/12/31 |
| Smart Home Camera | CS-H5-R201-1H3KFL4GA | Europe | 2031/12/31 |
| Smart Home Camera | CS-H6-R100-1J5WF | Europe | 2031/12/31 |
| Smart Home Camera | CS-H7c-R100-8G44WF | Europe | 2031/12/31 |
| Smart Home Camera | CS-H7c-R101-8H33WF | Europe | 2031/12/31 |
| Smart Home Camera | CS-H80f-R100-8G444WKFL | Europe | 2031/12/31 |
| Smart Home Camera | CS-H8c-R100-1J4WKFL | Europe | 2031/12/31 |
| Smart Home Camera | CS-H8c-R100-1K3WKFL | Europe | 2031/12/31 |
| Smart Home Camera | CS-H8c-R200-1J4WKFL | Europe | 2031/12/31 |
| Smart Home Camera | CS-H8c-R200-1J5WKFL | Europe | 2031/12/31 |
| Smart Home Camera | CS-H8c-R200-1K3KFL4GA | Europe | 2031/12/31 |
| Smart Home Camera | CS-H8c-R200-1K3WKFL | Europe | 2031/12/31 |
| Smart Home Camera | CS-H8c-R200-8H8WKFL | Europe | 2031/12/31 |
| Smart Home Camera | CS-H8-R100-1H3WKFL | Europe | 2031/12/31 |
| Smart Home Camera | CS-H8-R100-1J5WKFL | Europe | 2031/12/31 |
| Smart Home Camera | CS-H90-R100-8H44WKFL | Europe | 2031/12/31 |
| Smart Video Doorbell | CS-HP5-R106-1W2TFC | Europe | 2031/12/31 |
| Smart Entry | CS-LT70-R200-WBCP-BK | Europe | 2031/12/31 |
| Router | CS-RT1-R100-3G0G | Europe | 2031/12/31 |
| Smart Home Camera | CS-SD3-R100-8W2SB | Europe | 2031/12/31 |
| Smart Home Camera | CS-TY1-R105-1L3WF | Europe | 2031/12/31 |
| Smart Home Camera | CS-EB8-R100-1K3FL4GA | Europe | 2032/1/11 |
| Smart Entry | CS-DL01-R200-ZB-BK-LK | Europe | 2032/4/15 |
| Smart Home Camera | CS-H6c-R105-1J4WF | Europe | 2032/9/11 |
| Smart Video Doorbell | CS-HP7-R105-1W2TFC | Europe | 2032/12/2 |
| Smart Video Doorbell | CS-HPD7-R105-1K3 | Europe | 2032/12/2 |
| Smart Video Doorbell | CS-TP7P-R200-BT-GR | Europe | 2033/1/8 |
| Smart Video Doorbell | CS-TP7-R100-1W2TFC | Europe | 2033/1/8 |
| Smart Video Doorbell | CS-TPD7-R100-1K3 | Europe | 2033/1/8 |
| Smart Video Doorbell | CS-EP3x-R100-6E32WPDL(PRO) | Europe | 2033/1/12 |
| Smart Video Doorbell | CS-EP7-R100-1W2HTFC | Europe | 2033/1/12 |
| Smart Video Doorbell | CS-EPD7-R100-1K3H | Europe | 2033/1/12 |
| Smart Home Camera | CS-EL3-R100-8C3WFL | Europe | 2033/11/6 |
Please follow the steps below:
1. Log in to your EZVIZ account.
2. On the Home page, click the 3-dot icon next to the name of your camera to enter the Device Settings page.
3. Turn on the Alarm Notification button, then you will be able to receive the messages when motion detection is triggered.
4. For some other models, you need to enter Notification on the Settings page, enable Receive Device Message and EZVIZ App Notification.
5. With Alarm Notification or Notification enabled, you can find alarm messages on the Event page of the EZVIZ App.
6. In the meanwhile, make sure the EZVIZ App has been allowed to access the Notification by Phone System.
Note: Turning off notifications doesn’t turn off Event Recording. The Event video will continue to be recorded.
If the issue remains unresolved, please contact the "EZVIZ support team" for further assistance.
Related Articles:
What to do if alarm notification is not pushed in APP?
Step 1: Log in to your EZVIZ account, tap the Account button in the lower right corner.
Step 2: Tap "Settings"
Step 3: Tap "General Settings"
Step 4: Tap "Device Auto Upgrade"
Step 5: Use the toggle button to enable "Device Auto Upgrade" and choose a convenient time period. All devices associated with this account will automatically update their firmware during the selected timeframe.
Note: The interface of the application may be different depending on the version update
If you are using a wired connection, please follow as below:
1.Connect the LAN interface of NVR to that of router using Ethernet cable
2.Connect the camera to the same router or NVR’s WiFi
3.Power on the NVR and connect it to a local monitor using VGA or HDMI cable
4.Follow the wizard on the local monitor, create a new device password and complete the setup
5.Make sure “Wired Internet Mode” is selected in Configuration - Network - General - Selection of Network Mode
6.Go to “Menu” >> “Camera” >> “Search” >> “Add” to link the cameras
7.Log into the EZVIZ app > click on the “plus” tab to add a device >> scan the QR code shown on the screen or the device label
If you are using a 5GHz WiFi connection, please follow as below:
1.Connect the camera to the same router or NVR’s WiFi
2.Power on the NVR and connect it to a local monitor using VGA or HDMI cable
3.Follow the wizard on the local monitor, create a new device password and complete the setup
4.Make sure “5G Uplink Mode” is selected in Configuration - Network - General - Selection of Network Mode
5.Go to “Menu” >> “Camera” >> “Search” >> “Add” to link the cameras
6.Log into the EZVIZ app > click on the “plus” tab to add a device >> scan the QR code shown on the screen or the device label
Please follow the steps below:
Step 1: Log in to your EZVIZ account, tap the profile icon on the top left.
Step 2: Tap Family & Guests.
Step 3: Check the shared devices to see devices that you share with other EZVIZ accounts and the accepted devices are those that you receive from other EZVIZ accounts.
To reset the admin password, you may reset the NVR box by pressing the reset button (the password would be defaulted to the original device verification code on the label) or follow the below steps:
- Double right-click your mouse at the left bottom corner of the login window.
- Click on “OK” when the prompt “Restore Default Password” pops up.
- And then the password would be defaulted to the verification code(6 capital letters) which you could locate on the white sticker of your NVR.


For most countries and regions, EZVIZ CloudPlay offers different subscription options. You can visit https://www.ezviz.com/cloudplay or contact us by sending an email to rma.glb@ezviz.com to know the availability of Home Plan/Premium Plan in your region.
To subscribe to the Home Plan/Premium Plan, please follow the steps below:
1. Log in to your EZVIZ account.
2. On the Home page, click the "3 dots" at the bottom right of the device window to enter the "Device Settings" page.
3. Scroll down to find and enter "CloudPlay".
4. Tap the "Subscribe" button.
5. Select a Home Plan as you need.
6. Accept the "EZVIZ SERVICE AGREEMENT".
7. Enter your billing information. Please make sure that your card supports Visa or MasterCard or American Express and that all information is entered correctly without unnecessary spaces.
8. Complete the subscription by submitting your payment.
9. You can directly add other camera(s) to the Home Plan by clicking the "+" button once you have successfully subscribed to the Home Plan.
*Please note that an EZVIZ account can only subscribe to one Home Plan.
RS2 can save up to 4 floor maps. Each map can support up to 500 square meters.
First use of multi layer map cleaning:
1. Place the Robot: For the first use, if you want to clean a certain floor, please move the RS2 and docking station to the corresponding floor;
2. Click [Start] to begin the cleaning task, and RS2 will automatically draw a new map.
Daily use of multi floor cleaning:
1. Place the Robot: After saving a floor map, please first move the RS2 and docking station to the corresponding floor;
2. Start cleaning: RS2 will automatically adapt to the corresponding floor map, just enable cleaning directly.
Step 1: Log in to your EZVIZ account, and tap the "Account" page
Step 2: Tap “Family &Guests”
Step 3: Tap “the shared device” you would like to add or delete permissions
Step 4: Tap “the guest account” you would like to edit permissions and “select the permissions” you would like to edit, and then tap the “Save” button on the top right corner to complete the settings
If you want to hide a channel, you may follow below steps to hide a channel on EZVIZ mobile app:
- log in your EZVIZ account
- go to the channel page by tapping on the name of your DVR/NVR
- tap on Hide Camera button on the bottom right corner
- enable the camera which you want to hide
If you want to unhide a channel, you may follow below steps to unhide a channel on EZVIZ mobile app:
- log in your EZVIZ account
- go to the channel page by tapping on the name of your DVR/NVR
- tap on Hide Camera button on the bottom right corner
- disable the camera which you want to unhide
To add other guest accounts to the same sharing, you can follow the steps below:
Step 1: Log in to your EZVIZ account, tap the "Account button" in the lower right corner of the Home page.
Step 2: Tap "Family & Guests".
Step 3: Tap "the shared device" you would like to add a guest account to.
Step 4: Tap "Add Sharing" and input the guest account's email address. Please ensure that the guest has registered their EZVIZ account and that the region of the guest account matches that of the owner account.
Step 5: Select the permissions and tap "Finish". When sharing devices with others, consent is required first. Therefore, toggle the two agreements of "EZVIZ family sharing service" and "EZVIZ service agreement" on the left side and tap Agree to proceed further.
If the guest account accepts the invitation, the devices are successfully shared.
If the issue remains unresolved, please contact the "EZVIZ support team" for further assistance.
* The interface of the application may be different depending on the version update and the device model.
Related Articles:
How to share the device to my families or friends?
Please follow the steps below:
1. Log in to your EZVIZ account.
2. On the Home page, click the 3-dot icon next to the name of your camera to enter the Device Settings page.
3. Tap on the device serial number to edit it, and then tap on the top right to save the settings.
4. Or, for some other models, tap the Name tab to edit the device name, then tap anywhere else to finish editing and save the settings.
| Model Type | Model Name | Max. Channels |
| X5S | X5S-4P | 4*5MP POE cameras 4*5MP IP cameras (EZVIZ or ONVIF) - POE cameras need to be connected to X5S directly with POE cable - IP cameras need to connect to the same router with X5S and then link together |
| X5S-8P | 8*5MP POE cameras 8*5MP IP cameras (EZVIZ or ONVIF) - POE cameras need to be connected to X5S directly with POE cable - IP cameras need to connect to the same router with X5S and then link together | |
| X5S-4W | 4*5MP Wi-Fi cameras (EZVIZ or ONVIF) - Cameras can either connect to the same router with X5S and then link together - Or connect directly with X5S wirelessly | |
| X5S-8W | 8*5MP Wi-Fi cameras (EZVIZ or ONVIF) - Cameras can either connect to the same router with X5S and then link together - Or connect directly with X5S wirelessly | |
| X5S-16L2 | 16*5MP IP Camera or 24*2MP IP Camera (EZVIZ or ONVIF) - IP cameras need to connect to the same router with X5S and then link together | |
| X5S-16H | The ONLY NVR model that can connect the router via Wi-Fi(5G), and connects up to 16 cameras (EZVIZ or ONVIF) - using NVR's 2.4G WiFi, connect up to 8*5MP - using NVR's 5G WiFi, connect up to 16*5MP - connecting to the same router with X5S and then link together, up to 16*5MP | |
| X5C | CS-X5C-4 | 4*1080P Wi-Fi cameras (EZVIZ or ONVIF) - Cameras can either connect to the same router with X5C and then link together - Or connect directly with X5C wirelessly |
| CS-X5C-8 | 8*1080P Wi-Fi cameras (EZVIZ or ONVIF) - Cameras can either connect to the same router with X5C and then link together - Or connect directly with X5C wirelessly | |
| NVR wired Kit | CS-X4-104/8/16P CS-VR104/8/16N (A1-18HV) | 4/8/16 refers to the max. channel (EZVIZ or ONVIF) can connect up to 4/8/16 POE cameras Camera models that might be included in the kit: CS-C3U-22ER/CS-CV110 (A1-54R)/CS-CV110 (A1-68R) (X) |
| DVR wired kit | CS-VR104/8/16D-31HV0 CS-X5-104/8T CS-VR104/8/16D (A1-12HV) | 4/8/16 refers to the max. channel can connect up to 4/8/16 analog cameras Camera models that might be included in the kit: CS-C3T-1PR/CS-C4T-2R/CS-C3T-2PR/CS-CA110 (A1-43R)/CS-CA110 (A1-42R) (X)/CS-CA150 (A1-42R) (X)/CS-CA110 (A1-43R) (X)/CS-CA150 (A1-43R) (X)/CS-CA110 (A1-45R) (X) |
| X3C/Vault Plus | CS-X3-8E | The ONLY NVR model that can be used as router. Does not support HDMI or VGA output. Connect up to 8 EZVIZ Wi-Fi and wired cameras. (max. 4 wired cameras) |
| X3 | CS-X3-108 | Does not support HDMI or VGA output. Up to 8 EZVIZ cameras. (Cameras need to connect to the same router with X3 and then link together) |
Please follow the steps below:
1. Log in to your EZVIZ account and enter the "Settings" page of your device.
2. Scroll down to find and enter "CloudPlay".
3. Tap the 3 dots on the top right to enter the "Manage" page.
4. Click "Enter Card Activation Code" or "Cloud Card Activation".
5. Enter the activation code and tap "Activate Now" to continue. Please be sure to use upper and lower case letters and do not leave any spaces in the activation code.
6. Tap "Continue" until the "Activation is successful" prompt appears in the app.
7. Make sure the "Recording" button on the "Manage" page is enabled, otherwise Cloudplay will not record.
Some EZVIZ cameras support restarting devices remotely when the camera is online. If your camera supports this feature, click "Restart" on the camera Settings page. Then the device will go offline for a while and will be online automatically afterwards.
Please kindly note that if you enable smart tracking, the camera will start tracking when being triggered by the moving object. Then, when the tracking ends and it is not triggered for 30 seconds, the camera will rotate to the maximum degree and then return to the original position where the camera is triggered. This should be the reason why you would see the camera rotate itself from time to time.
*Related Articles:
How to enable or disable the smart tracking feature on the EZVIZ App
The latest EZVIZ app is compatible with iOS 11.0 or later, and Android 6.0 or later.
The following models support direct download of videos stored on an SD card by the EZVIZ App. Please make sure you have the latest version of the EZVIZ App and device firmware.
| Model Name | Device Version or later than this version |
| CS-BC1c-R100-2F8WFL | V5.4.0 build 230910 |
| CS-BM1-R100-2D2WF-Be | V5.3.6 build 220110 |
| CS-BM1-R100-2D2WF-Ra | V5.3.6 build 220110 |
| CS-C3TN-A0-1H2WFL | V5.3.5 build 211220 |
| CS-C3TN-R100-1K2WF | V5.3.8 build 220906 |
| CS-C3TN-R100-1K2WFL | V5.3.8 build 220906 |
| CS-C3TN-R100-1K3WKFL | V5.3.8 build 220825 |
| CS-C60p-R100-8G33WF | V5.3.8 build 240508 |
| CS-C60p-R100-8G44WF | V5.3.8 build 240617 |
| CS-C60p-R100-8G55WFL | V5.3.8 build 240605 |
| CS-C60p-R100-8H33WF | V5.3.8 build 240626 |
| CS-C61p-R100-8G55WFL | V5.3.8 build 240901 |
| CS-C6c-R100-1H3WF | V5.3.8 build 220705 |
| CS-C6c-R100-8G8WF | V5.3.8 build 231120 |
| CS-C6N-D0-2C3WF | V5.3.8 build 230210 |
| CS-C6N-D0-8B4WF | V5.3.2 build 230927 |
| CS-C6N-D0-8B4WF-IND | V5.3.2 build 240301 |
| CS-C6N-R105-1L3WF | V5.3.8 build 240407 |
| CS-C6N-R105-1L3WF-KJDS | V5.3.8 build 240902 |
| CS-C6N-R200-1Q5WFL | V5.3.9 build 250401 |
| CS-C6N-R200-1R5WFL | V5.3.9 build 250401 |
| CS-C6N-R200-8H8WFL | V5.3.9 build 250318 |
| CS-C7-R100-8G44WF | V5.3.8 build 231101 |
| CS-C7-R101-8G44WF | V5.3.8 build 240719 |
| CS-C8c-R100-1J4WKFL | V5.3.8 build 230811 |
| CS-C8c-R100-1J5WKFL | V5.3.8 build 231008 |
| CS-C8c-R100-1K2WKFL | V5.3.8 build 240101 |
| CS-C8c-R100-8H8WKFL | V5.3.8 build 240429 |
| CS-C8c-R200-8H8WKFL | V5.3.8 build 240201 |
| CS-C8W-A0-1H3WKFL | V5.3.8 build 220903 |
| CS-C8W-A0-1J5WKFL | V5.3.8 build 220901 |
| CS-C90-R100-8H44WKFL | V5.3.8 build 240801 |
| CS-CB2-R100-2D2WF-BK | V5.3.6 build 221214 |
| CS-CB2-R100-2D2WF-WH | V5.3.6 build 221214 |
| CS-CB2-R105-1K3F4GA-BK | V5.4.0 build 240311 |
| CS-CB2-R105-1K3F4GA-LBK | V5.4.0 build 240507 |
| CS-CB2-R105-1K3F4GA-LWH | V5.4.0 build 240507 |
| CS-CB2-R105-1K3F4GA-WH | V5.4.0 build 240311 |
| CS-CB3-R200-1K3FL4GA | V5.4.0 build 240724 |
| CS-CB3-R200-1K3FL4GA-LA | V5.4.0 build 240724 |
| CS-CB3-R200-1K3WFL | V5.4.0 build 240415 |
| CS-CB5-R100-2F8WFL | V5.4.0 build 230822 |
| CS-CB8c-R100-1N4WFL | V5.4.0 build 240911 |
| CS-CB8c-R100-1N4WL4GA | V5.4.0 build 241109 |
| CS-CB8-R200-1M8WFL | V5.3.6 build 241107 |
| CS-CB90-R100-1M44WFL | V5.4.0 build 241001 |
| CS-CB90x-R100-1M22FL4GA | V5.4.0 build 240625 |
| CS-CB90x-R100-1M22FL4GLA | V5.4.0 build 240625 |
| CS-CB90x-R100-1M22W4GA | V5.4.0 build 240625 |
| CS-CB90x-R100-1M22W4GLA | V5.4.0 build 240625 |
| CS-CB90x-R100-1M33W4GA | V5.4.0 build 240822 |
| CS-CB90x-R100-1M33W4GLA | V5.4.0 build 240822 |
| CS-CB90x-R100-1M44W4GA | V5.4.0 build 250101 |
| CS-CB90x-R100-1M44W4GLA | V5.4.0 build 250101 |
| CS-CP1-A0-2C3WF | V5.3.8 build 230210 |
| CS-CP1-A0-8B4WF | V5.3.2 build 230927 |
| CS-CP1-R105-1H3WF | V5.3.8 build 240119 |
| CS-CP1-R105-1J4WF | V5.3.8 build 231207 |
| CS-CP1-R105-1L2WF | V5.3.8 build 230811 |
| CS-CP1-R105-1L3WF | V5.3.8 build 240407 |
| CS-CP1-R105-8H8WF | V5.3.8 build 240807 |
| CS-CP3-R100-1K2WPDL | V5.4.0 build 240701 |
| CS-CPD5-R100-1H2 | V5.3.6 build 240704 |
| CS-CPD7-R105-1K3 | V5.3.6 build 230920 |
| CS-CPD7-R106-1K3 | V5.3.6 build 240222 |
| CS-E4p-R100-8C6WKF | V5.3.8 build 240901 |
| CS-E6-R100-8C5W2F | V5.3.8 build 230209 |
| CS-EB3-R200-1K3FL4GA | V5.4.0 build 240401 |
| CS-EB3-R200-1K3FL4GA-LA | V5.4.0 build 240506 |
| CS-EB3-R200-1K3WFL | V5.4.0 build 230718 |
| CS-EB5-R100-2F8WFL | V5.4.0 build 230822 |
| CS-EB8-R100-1K3FL4GA | V5.4.0 build 240227 |
| CS-EB8-R200-1M8W4GA | V5.4.0 build 241014 |
| CS-EB8-R200-1M8W4GA-CF | V5.4.0 build 241017 |
| CS-EB8-R200-1M8W4GLA | V5.4.0 build 241022 |
| CS-EB8-R200-1M8W4GLA-CF | V5.4.0 build 241022 |
| CS-EL3-R100-8C3WFL | V5.3.8 build 230726 |
| CS-EP3x-R100-6E32WPDL | V5.4.0 build 230705 |
| CS-EP8x-R100-1M42WPDL | V5.4.0 build 250423 |
| CS-EPD7-R100-1K3H | V5.4.0 build 230901 |
| CS-H3c-R100-1J4WKFL | V5.3.8 build 230804 |
| CS-H3c-R100-1K2WF | V5.3.8 build 220525 |
| CS-H3c-R100-1K2WFL | V5.3.8 build 220525 |
| CS-H3C-R100-1K2WFL-BR | V5.3.8 build 230313 |
| CS-H3C-R100-1K2WFL-FT | V5.3.8 build 240523 |
| CS-H3c-R100-1K2WF-STQC | V5.3.8 build 240919 |
| CS-H3c-R100-1K3WKFL | V5.3.8 build 220825 |
| CS-H3c-R100-1K3WKFL-BR | V5.3.8 build 240401 |
| CS-H4-R201-1H3EKFL | V5.3.8 build 240419 |
| CS-H4-R201-1H3WKFL | V5.3.8 build 230329 |
| CS-H5-1H3KFL4GA-IND | V5.3.8 build 240322 |
| CS-H5-R201-1H3EKFL | V5.3.8 build 240419 |
| CS-H6c-R100-8B4WF | V5.3.2 build 230927 |
| CS-H6c-R105-1H3WF | V5.3.8 build 240119 |
| CS-H6c-R105-1J4WF | V5.3.8 build 231207 |
| CS-H6c-R105-1J4WF-KR | V5.3.8 build 240226 |
| CS-H6c-R105-1J5WF | V5.3.8 build 240227 |
| CS-H6c-R105-1L2WF | V5.3.8 build 230430 |
| CS-H6c-R105-1L2WF-BR | V5.3.8 build 231007 |
| CS-H6c-R105-1L2WF-IND | V5.3.8 build 240315 |
| CS-H6c-R105-1L3WF | V5.3.8 build 240407 |
| CS-H6c-R105-1L3WF-BR | V5.3.8 build 240814 |
| CS-H6c-R105-8H8WF | V5.3.8 build 240807 |
| CS-H6c-R200-1Q5WFL | V5.3.9 build 250401 |
| CS-H6c-R200-1R5WFL | V5.3.9 build 250401 |
| CS-H6c-R200-8H8WFL | V5.3.9 build 250318 |
| CS-H6-R100-1J5WF | V5.3.8 build 231129 |
| CS-H7c-R100-8G44WF | V5.3.8 build 231101 |
| CS-H7c-R101-8H33WF | V5.3.8 build 240511 |
| CS-H7c-R101-8H44WF | V5.3.8 build 240718 |
| CS-H7c-R105-8H44WF4G | V5.3.9 build 250222 |
| CS-H7c-R105-8H44WFL4G | V5.3.9 build 250222 |
| CS-H80f-R100-8G444WKFL | V5.3.8 build 240831 |
| CS-H80x-R100-8G82WKFL | V5.3.8 build 240603 |
| CS-H8c-1K3KFL4GA-IN | V5.3.8 build 240130 |
| CS-H8c-1K3KFL4GA-IND | V5.3.8 build 240221 |
| CS-H8c-R100-1J4WKFL | V5.3.8 build 230811 |
| CS-H8c-R100-1J4WKFL-BR | V5.3.8 build 231025 |
| CS-H8c-R100-1K2WKFL | V5.3.8 build 230808 |
| CS-H8c-R100-1K3WKFL | V5.3.8 build 230808 |
| CS-H8c-R200-1J4WKFL | V5.3.8 build 230811 |
| CS-H8c-R200-1J5WKFL | V5.3.8 build 231008 |
| CS-H8c-R200-1K2EKFL | V5.3.8 build 231201 |
| CS-H8c-R200-1K2WKFL | V5.3.8 build 231201 |
| CS-H8c-R200-1K3EKFL | V5.3.8 build 231201 |
| CS-H8c-R200-1K3KFL4GA | V5.3.8 build 230808 |
| CS-H8c-R200-1K3KFL4GA-IN | V5.3.8 build 240130 |
| CS-H8c-R200-1K3WKFL | V5.3.8 build 231201 |
| CS-H8c-R200-1K3WKFL-BR | V5.3.8 build 240301 |
| CS-H8c-R200-8H8WKFL | V5.3.8 build 240130 |
| CS-H8-R100-1H3WKFL | V5.3.8 build 220906 |
| CS-H8-R100-1J5WKFL | V5.3.8 build 220901 |
| CS-H8x-R100-8H4WKFL | V5.3.8 build 240701 |
| CS-H90-R100-8H44WKFL | V5.3.8 build 240501 |
| CS-H9c-R100-8G55WKFL | V5.3.8 build 231109 |
| CS-H9c-R100-8H33WKFL | V5.3.8 build 231025 |
| CS-H9c-R105-8H55WFL | V5.3.8 build 250515 |
| CS-HB8-1K3FL4GA-IND | V5.4.0 build 240606 |
| CS-HB8-1K3FL4GA-LK | V5.4.0 build 240907 |
| CS-HB8c-R100-1N4WFL | V5.4.0 build 240911 |
| CS-HB8c-R100-1N4WL4GA | V5.4.0 build 241109 |
| CS-HB8-R100-1K3FL4GA-IND | V5.3.8 build 240606 |
| CS-HB8-R100-2C4WDL | V5.3.6 build 220613 |
| CS-HB8-R110-2C4WDL | V5.3.6 build 231120 |
| CS-HB8-R200-1M8WFL | V5.4.0 build 241017 |
| CS-HB90-R100-1M44WFL | V5.4.0 build 240715 |
| CS-HB90x-R100-1M44W4GA | V5.4.0 build 250101 |
| CS-HB90x-R100-1M44W4GLA | V5.4.0 build 250101 |
| CS-HGC2-R100-8H3HFL | V5.3.8 build 240920 |
| CS-HP3-R100-1K3WPDL | V5.4.0 build 240328 |
| CS-HP7-R200-1W2TFC | V1.0.1 build 241012 |
| CS-HPD5-R100-1H2 | V5.3.6 build 240131 |
| CS-HPD5-R106-1H2 | V5.3.6 build 250107 |
| CS-HPD7-R100-1K3 | V5.3.6 build 220820 |
| CS-HPD7-R101-1K3 | V5.3.6 build 230627 |
| CS-HPD7-R105-1K3 | V5.3.6 build 230920 |
| CS-HPD7-R106-1K3 | V5.3.6 build 240222 |
| CS-HPD7-R107-1K3 | V5.3.6 build 240222 |
| CS-HPD7-R400-8G8 | V5.3.6 build 241113 |
| CS-PM6-R101-6J3WF | V5.4.0 build 241225 |
| CS-PM6-R200-6J3WF | V5.4.0 build 250401 |
| CS-R5C-R100-8F | V2.12.0 build 220418 |
| CS-R61-A1 | V2.0.0301 build 240808 |
| CS-R61-A12 | V2.0.0301 build 240808 |
| CS-R61-A15 | V2.0.0301 build 240808 |
| CS-RS20-MAX-TGA | V2.0.1813 build 240830 |
| CS-RS20-NEO-KGA | V2.0.2401 build 250314 |
| CS-RS20-PRO-PGA2 | V2.0.0001 build 230506 |
| CS-RS20-PRO-PGA5 | V2.0.0001 build 230506 |
| CS-RS20-PRO-PGA-I | V2.0.0001 build 230506 |
| CS-RS20-PRO-TGA2 | V2.0.0001 build 230506 |
| CS-RS20-PRO-TGA5 | V2.0.0001 build 230506 |
| CS-RS20-PRO-UGA2 | V2.0.0001 build 230506 |
| CS-RS20-PRO-UGA5 | V2.0.0001 build 230506 |
| CS-RS20-PRO-UGA-I | V2.0.0001 build 230506 |
| CS-RS2-PRO-PGA-I | V2.0.0001 build 230506 |
| CS-RS2-PWT1 | V1.903.026 build 220811 |
| CS-RS2-TWT2 | V1.903.026 build 220811 |
| CS-RS2-TWT5 | V1.903.026 build 220811 |
| CS-S10-R100-1M4WFK | V5.3.8 build 241211 |
| CS-S10-R101-1M4WFK | V5.3.8 build 250401 |
| CS-TPD7-R100-1K3 | V5.3.6 build 230920 |
| CS-TPD9-R100-8G8 | V5.4.0 build 250201 |
| CS-TY1-C0-2C3WF | V5.3.8 build 230210 |
| CS-TY1-C0-8B4WF | V5.3.2 build 230927 |
| CS-TY1-C0-8B4WF-IND | V5.3.2 build 240301 |
| CS-TY1-R105-1H3WF | V5.3.8 build 240119 |
| CS-TY1-R105-1J4WF | V5.3.8 build 231207 |
| CS-TY1-R105-1J5WF | V5.3.8 build 240227 |
| CS-TY1-R105-1L2WF | V5.3.8 build 230811 |
| CS-TY1-R105-1L3WF | V5.3.8 build 240407 |
| CS-TY1-R105-8H8WF | V5.3.8 build 240807 |
| CS-TY7-R100-8G44WF | V5.3.8 build 240120 |
1) Go to the App store on your iPad.
2) Type EZVIZ HD in the search bar.
3) Click on "GET", download and start enjoying those beautiful moments you love.
Step 1: Log in to your EZVIZ account, tap the profile icon on the top left
Step 2: Tap CloudPlay
Step 3: Tap the three-dot icon on the top right
Step 4: Then tap CloudPlay Subscriptions and you would be able to see all the payment history of CloudPlay under this account
Please follow the steps below:
Step 1: Log in to your EZVIZ account, tap the "Account" button in the lower right corner.
Step 2: Tap "Settings".
Step 3: Tap "General Settings".
Step 3: Tap "Language".
Step 4: Select the language you would like to set and tap "Save" to complete the settings.
Note: The interface of the application may be different depending on the version update.
If your EZVIZ account is linked to both an email address and a phone number, you can see the option to delete one of them. However, we still strongly recommend you link both in case of account recovery.
Step 1. Log in to your EZVIZ account, and tap the "Account" page
Step 2. Tap the profile picture at the top of the page
Step 3: Tap “the email or phone number” you would like to delete
Step 4: Tap “delete email or phone number” and choose “the way of verification”
Step 5: The email or phone number would be deleted after you input the code sent to your email or phone number
Please follow the steps below:
Step 1: From the Library Page, tap the second icon in the upper right corner to enter the Library Settings page.
Step 2: Tap Push Notification Settings.
Step 3: Tap Email Alerts.
Step 4: Select the devices you would like to receive notifications for and tap Save.
Note: If your account is not linked to an email address, please link an email address first. then select the devices for which you would like to receive notifications and tap Save, the linked email address would be able to receive the notifications.
Click here to see the details.
This method is applied for the EZVIZ customers in the US and UK region. For other countries/regions, this feature might not be available.
All CloudPlay videos support quickplay at 1X, 4X, 8X, 16X and 32X speed.
However, if you use a Micro SD card as the storage medium, please note that only some EZVIZ cameras support quickplay on MicroSD card video in 1X, 4X, 8X, and 16X speed. If your device does not support this feature, you can connect your camera and mobile phone under the same router, then on the EZVIZ APP, go to LAN Live View>Tap Start Scanning>View video by Fast Play. For more detailed information, please contact the EZVIZ support team at support@ezviz.com.
Please follow the below steps to add your device:
1. Please ensure your NVR is online.
2. Then scan the QR code on the white sticker at the bottom of the NVR box and you should be able to add your device.
If prompted for a password during adding, please kindly note that the password would be the verification code that you could find on the white sticker of the NVR box.
If prompted for an encryption password when viewing a camera, please kindly note that the password would either be the login password you created for the NVR during the initial setup (if your cameras are set up by adding to NVR directly) or the verification code you could find on the white sticker of each camera you have (if your cameras are set up via EZVIZ app).
Please follow the steps below:
Step 1. Log in to your EZVIZ account, and tap the "Account" page
Step 2. Tap the profile picture at the top of the page
Step 3: Tap "Login Settings".
Step 4: Tap "Terminal Management".
Step 5: Select the terminal you would like to delete and swipe left for IOS users or long press it for Android users, then you would see the "Delete" option. You may also tap "One-Click Cleanup" in the top right corner to delete all the terminals in batch.
The IR spectrum is 850nm.
When you bind your product to your account using local connectivity features, you need to set a password, which will be used as both the video encryption password for your product and the login password for the local connectivity features, such as SADP, RTSP, netSDK, Onvif, etc. When you change your password through the path of Device-Settings-Privacy Settings-Change Encryption Password, it is deemed that the video encryption password and the local connectivity features login password have been changed synchronously.
If your EZVIZ cameras support turning off the IR light on the EZVIZ APP, please follow the steps below:
1. Login to your EZVIZ account.
2. On the Home page, click the 3-dot icon next to your camera's name to access the Device Settings page.
3. Locate the IR Light button and uncheck it. Alternatively, scroll down to find Image Settings, select Day Mode and the IR light would be turned off.
(* The interface of the application may be different depending on the version update and device model).
If you are unable to cancel the CloudPlay subscription on your own by going to the camera Settings > Cloud Storage > Subscription Management > Cancel Subscription on the EZVIZ APP, in order to provide the cancellation service, we would like to ask you to provide the following information by contacting EZVIZ at rma.glb@ezviz.com:
- The 9-digit SN of your EZVIZ camera
- The email address you used to subscribe to cloud storage or receive the CloudPlay receipt
- A screenshot of the subscription confirmation email
- Apply reason
Also, please note that when canceling the subscription:
1. There are no refund/pro-rated dates.
2. The recording plan will expire at the end of the subscription period.
Please follow the steps below:
1. Reset the camera by pressing the Reset button for 4-5 seconds.
2. Connect the camera to the LAN port of your router using the Ethernet cable.
*When the LED indicator turns slow-flashing blue, it indicates that the camera is connected to the router.
3. Log in to your account using the EZVIZ app.
4. On the Home screen, tap the“+” on the upper-right corner to go to the Scan QR Code interface.
5. Scan the QR code on the sticker of the camera.
6. Follow the EZVIZ app wizard to add the camera to your EZVIZ app account.
Please follow the steps below:
Step 1: Sign in to your EZVIZ account and tap the profile icon in the top left corner.
Step 2: From the menu, choose Settings.
Step 3: Tap General Settings.
Step 4: Tap Dark Mode.
Step 5: Within the Dark Mode settings, select the Dark Mode option. Afterward, simply exit the page, and your preferences will be saved automatically.
Note: Enabling Dark Mode in the EZVIZ app will only affect the app's appearance. If you select "Auto", the app will adapt to your phone's system-wide settings.
Regarding this, please try switching the network your phone connects to, for example, using phone data or if your router is dual band, using 5G Wi-Fi.
Meanwhile, kindly note that network connection may affect the streaming performance of your EZVIZ devices, thus we do suggest an average upload speed of 2 Mbps or better. To check the speed, you may stand by your EZVIZ device, connect your mobile phone to your Wi-Fi, and visit www.speedtest.net to test.
(For a 3MP device, we do suggest an average upload speed of 3 Mbps or better. If a 4MP device, we do suggest an average upload speed of 4 Mbps or better.)
If you are still experiencing live view issues in your Wi-Fi network, you may also try to change the channel settings for your router or remove some devices you seldom use from your router to ensure sufficient bandwidth.
Involved model: BM1/BC1/HB8/BC1C, etc.
Kindly note the actual battery life will vary depending on environmental factors, network stability, and the frequency of camera activities.
Thus, to optimize the battery life, we suggest you check the following:
1. Low temperature. As the battery inside is a lithium-ion battery, if the temperature is low, the charging would be slowed, so you may need to charge more often at temperatures below 0°C.
2. Weak Wi-Fi connection. Please ensure the network connection is good and there is no barrier or radio interference between your camera and your router causing an unstable network. You may open the EZVIZ mobile app > enter camera Settings > Network Settings and tap Wi-Fi Signal Strength to test the signal.
3. Meanwhile, you can try the below settings to reduce battery drain:
- enable Power Saving or Super Power Saving mode (only active live view can wake up the camera) in camera Settings > Working Mode or Battery.
- decrease detection sensitivity in camera Settings > Intelligent Detection.
- draw detection areas in camera Settings > Intelligent Detection.
Please follow the steps below:
1. Log in to your EZVIZ account.
2. On the Home page, click the 3-dot icon next to the name of your camera to enter the Device Settings page.
3. Tap Storage Status or Record List.
4. Tap Memory Card and then tap Initialize/Reformat.
If the issue remains unresolved, please contact the "EZVIZ support team" for further assistance.
Related Articles:
What to do if the SD card cannot be initialized?
Please follow the steps below:
Step 1: From the Library Page, tap the second button on the top right to enter the Library Settings page.
Step 2: Tap Push Notification Settings.
Step 3: Then tap Notification Sound and select the tone you would like to set for each type of event.
Please follow the steps below:
Step 1. Log in to your EZVIZ account, and tap the "Account" page
Step 2: Tap "Family & Guests".
Step 3: Tap "the shared device" you would like to remove a guest account.
Step 4: Tap "Remove User" on the bottom.
Please follow the steps below:
Step 1: Log in to your EZVIZ account, tap the profile icon on the top left.
Step 2: Enter My Album.
Step 3: Tap Edit on the top right corner.
Step 4: Then select the files you would like to save and tap Save.
Alternatively, when you play each file, you would also be able to see the save icon.
Please note that service transfer is only supported between devices with the same account. If you want to transfer the CloudPlay service to another camera under your account, please follow the steps below:
1. Log in to your EZVIZ account and enter the "Settings" page of the new device you want to transfer the CloudPlay service to.
2. Scroll down to find and enter "CloudPlay".
3. Tap the "3 dots" in the upper right corner.
4. Tap the "Transfer" button, select the device with the service you want to transfer and click "Submit".
5. Make sure to start the service transfer by clicking the "Next" button.
6. Please wait until the CloudPlay is successfully transferred.
If you encounter any difficulties when transferring the CloudPlay service, please contact EZVIZ by sending an email to rma.glb@ezviz.com.
Please follow the steps below:
1. Check the power source: Make sure the power outlet you're using is working properly. You can also try plugging the camera into a different outlet.
2. Check the power cable: Check that the power cable is not damaged or frayed. You can also try using a different power cable to see if this solves the problem.
3. Reset the camera: Try resetting the camera by pressing and holding the Reset button for about 10 seconds. This will usually restore the camera to its default settings and may help to resolve minor problems.
If the problem persists or if you encounter any further difficulties, please don't hesitate to reach out to EZVIZ customer support for additional assistance.
Please follow the steps below:
1. From the Home Page, tap the plus icon on the top right.
2. Tap Create New Space.
3. At the bottom, tap Create New Space again.
4. Custom space name or select one existing name.
5. Select the devices you would like to add in the space and click Done to complete the settings.
Note: you can edit the space at any time by tapping the Edit button beside the space name.
Kindly note that the EZVIZ account does not support changing regions once it is registered. If you would like to have an account of a different region, you may need to register a new account and select the region as you desire.
Please follow the below steps to set up your X5S-4P, X5S-8P:
1. Connect the LAN interface of NVR to that of router using Ethernet cable.
2. For POE cameras, connect the camera to the POE port of NVR.
3. For IP cameras, connect the camera to the same router.
4. Connect the mouse to the USB interface of NVR and connect the NVR to a local monitor using a VGA or HDMI cable.
5. Connect the NVR to a power source and turn on the power switch.
6. Follow the wizard on the local monitor, create a new device password, and complete the setup.
7. Go to “Menu” >> “Camera” >> “Search” >> “Add” to link the cameras.
8. Log into the EZVIZ app > click on the “plus” tab to add a device >> scan the QR code shown on the screen or the device label.
To better assist you, please provide the following information by contacting EZVIZ at rma.glb@ezviz.com:
1. the 9-digit SN of your EZVIZ camera
2. the email address you used to subscribe to CloudPlay
3. the payment for which you are requesting an invoice
4. if the invoice is requested for your company, please provide us with the company information as well.
Please note that if your CloudPlay service is still in the free trial period, you will need to contact us with the above information when you actually pay for the subscription after the free trial period ends.
Please follow the instructions below to set up your X5S-16L2:
1. Connect the LAN interface of NVR to that of the router using an Ethernet cable.
2. Connect the camera to the same router.
3. Connect the mouse to the USB interface of the NVR and connect the NVR to a local monitor using a VGA or HDMI cable.
4. Connect the NVR to a power source and turn on the power switch.
5. Follow the wizard on the local monitor, create a new device password, and complete the setup.
6.Go to “Menu” >> “Camera” >> “Search” >> “Add” to link the cameras.
7. If you intend to add 24*2MP cameras, please do remember to set 24-Channel Mode in “Menu” >> “Configuration” >> “General” >> “Enable 24-Channel Mode”.
8. Log into the EZVIZ app > click on the “plus” tab to add a device >> scan the QR code shown on the screen or the device label.
Please follow the steps below:
Step 1. Log in to your EZVIZ account, and tap the "Account" page
Step 2. Tap the profile picture at the top of the page
Step 3: Tap "Login Settings".
Step 4: Tap "Two-Step Verification" and enable/disable the button.
Please follow the steps below to check the left storage of X5C and X5S:
Right-click the mouse to go to Menu > HDD > General > Free Space.
Or, right-click the mouse to go to Menu > Maintenance > System Info > HDD > Free Space.
*Please kindly note that you can only check the free space on the monitor. On the EZVIZ mobile app, the storage in Settings > Storage Status > HDD refers to the HDD's total capacity.
Please note that this message usually indicates that the device has reached its maximum connection at the same time. Please check if you have shared your account or device with your family or friends. If so, please advise them to log out of the account. If not, please turn off the device and turn it on again, this should solve the problem.
For personalized guidance on dual-lens cameras, such as the H9c, feel free to contact the "EZVIZ support team" for further assistance.
For best performance, you may follow the below to place your solar panel:
1. Please do not place the solar panel under shades and ensure it gets the most sunlight.
2. Please do not place the solar panel completely parallel to the ground to avoid dust or other dirt.
3. The solar panel should be tilted to receive maximum solar radiation and the recommended tilt angle is 25°-40°.
If you encounter an error prompt of "The Solar Panel with Battery Storage" is "Not connected", please note that the interface for linking the solar panel with battery storage is designed for different models: the PBC12 and PBC24 solar panels.
Solar panel models C, D, E, and F, as well as models PSP5 and PSP8, cannot be added to the EZVIZ app and do not need to be added. You can tell when the cameras are charging with the solar panel by checking the sun-like icon in Settings > Battery on the EZVIZ mobile app.
If you still have further concerns, please contact the EZVIZ support team for further assistance.
Related Articles:
What to do if my EZVIZ camera cannot be charged
Please follow the steps below:
Step 1: Log in to your EZVIZ account, tap the Profile Photo on the top left.
Step 2: Tap Family & Guests.
Step 3: Tap the edit icon on the top right.
Step 4: Select the devices you would like to end sharing and tap End Sharing to complete the settings.
Please follow the steps below:
Step 1: Log in to your EZVIZ account, tap the "Account" button in the lower right corner.
Step 2: Tap "Settings".
Step 3: Tap "General Settings".
Step 4: Tap "Device Auto Upgrade".
Step 5: Use the toggle button to enable or disable the "Device Auto Upgrade" and choose a convenient time period.
Note: The interface of the application may be different depending on the version update
Please follow the steps below:
Step 1: Log in to your EZVIZ account, tap the "Account” button in the lower right corner.
Step 2: Tap "Settings”.
Step 3: Tap "General Settings".
Step 4: Tap "Storage".
Step 5: Then tap "Clear" to clear the cache.
Please follow the steps below:
Step 1. Log in to your EZVIZ account, and tap the "Account" page
Step 2. Tap the profile picture at the top of the page
Step 3: Tap ”Login Settings“.
Step 4: Tap the button to enable or disable "Face ID"
.
Please follow the steps below:
Step 1. Log in to your EZVIZ account, and tap the "Account" page
Step 2. Tap the profile picture at the top of the page
Step 3: Tap "Login Settings".
Step 4: Tap the button to enable or disable "Fingerprint ID".
Step 1: Tap the profile icon on top left corner
Step 2: Tap Settings
Step 3: Tap About EZVIZ and here you would see the app version on the top. You can also click Check for Updates to see latest available versions.
Please follow the steps below:
Step 1: Log in to your EZVIZ account, tap the Profile Photo on the top left.
Step 2: Tap Settings.
Step 3: Tap General Settings.
Step 4: Tap Storage and then you will be able to see the storage EZVIZ app used.
Please follow the steps below:
Step 1: Log in to your EZVIZ account, and tap one camera to enter the live view page.
Step 2: Tap the full-screen icon in the bottom right corner of the screen and you will be able to watch the live stream or playback in full-screen mode.
Step 3: To exit full-screen mode, tap the “<” icon at the top left of the screen.
Please follow the below steps to add your device:
1. Please ensure the NVR/DVR is online.
2. Then on the monitor, right-click your mouse to enter Menu > System Information > Device Info.
3. Scan the QR code shown on the screen and you would be able to add your NVR/DVR.
If prompted for a password, please kindly note the password would be the password you created for the DVR/NVR during the initial setup.
Please follow the steps below:
1. Connect your phone to a Wi-Fi network (the device only supports 2.4G Wi-Fi network);
2. Download and install the "EZVIZ" App, and complete user registration according to the prompts;
3. Press and hold the power button of RS2 for 4s until it is turned on;
4. Select Add Device to enter the scan QR code interface;
5. Scan the QR code on the body of RS2 and complete the network configuration and addition of the device according to the interface prompts.
When using the router for the first time, you should configure the parameters through the computer or the mobile phone. We take the mobile phone as an example:
1. Confirm that the device has been connected correctly, powered on normally, and the LED indicator is solid green.
2. Connect your mobile phone to the wireless network of the device (Network Name: ezviz_XXXXXX, no password by default).
3. Open the browser of your mobile phone, input "wifi.ezvizlife.com", and go to the configuring page.
4. Set the parameters such as the device management password, Wi-Fi name and password, etc.
Map creation can be initiated from the EZVIZ app. By using d-TOF laser radar, the mapping accuracy can reach 15mm.
If you are experiencing difficulties with audio pickup during live view or playback, please follow the steps below:
1. Make sure that the volume icon is not muted and that the Audio Settings are also enabled on the Device Settings page.
2. Check that the speaker volume on your phone is turned up and working properly. You can go to your phone's settings page to check the sound settings, make sure the media sound is turned on, and the phone is not in Do Not Disturb or Focus mode (for iPhone).
3. If your EZVIZ devices support two-way talk, please check if you can hear any sound when using two-way talk.
If the problem persists or if you encounter any further difficulties, please don't hesitate to reach out to EZVIZ customer support for additional assistance.
Please follow the steps below to check the left storage of X4 and X5:
Right-click the mouse to go to Menu > System Information > Device Info > HDD > Free Space.
Or, right-click the mouse to go to Menu > Device Management > Advanced Settings> HDD > Free Space.
*Please kindly note that you can only check the free space on the monitor. On the EZVIZ mobile app, the storage in Settings > Storage Status > HDD refers to the HDD's total capacity.
Please follow the steps below:
1. Click the "3 dots" at the bottom right of the device window on the Home page to enter the "Device Settings" page.
2. Scroll down to find the "CloudPlay" and enter it.
3. Tap the "Subscribe" button.
4. Select the plan, agree to the "EZVIZ SERVICE AGREEMENT" and tap the credit card (or Paypal Checkout) box.
5. Enter your billing information and tap "Continue". Please make sure that your card supports Visa or MasterCard or American Express and that all information is entered correctly without unnecessary spaces.
6. Submit the payment to continue.
7. You have successfully subscribed to CloudPlay.
If you need to export some clips on your monitor, please follow the steps below:
1. Log into your NVR monitor.
2. Connect your external USB storage device to your NVR’s USB port.
3. Right-click your mouse to enter the Main Menu > Export > Normal > Export.
4. Select the video(s) you want to export, select the time and date you wish to export, and click on the “Export” tab at the bottom of the page, select the destination location on your USB External Storage device and complete the process.
If you need to export some clips remotely on your mobile phone:
Unfortunately, the EZVIZ mobile app does not support selecting and downloading clips directly, so you may export on the monitor or you may manually record the clips you would like on the EZVIZ app to export by following the steps below:
1. Log into your EZVIZ account and tap on the device cover picture to go to the Live View page.
2. From the Live View tap on the "Record" icon and the recording will start, tap on the icon to stop the recording.
3. Go back to the Home page, then from the top left corner tap on the "Profile" icon, then tap on "My Album".
4. Locate the video you just recorded and save it to your mobile device.
Please be advised that the error code 330009 typically indicates a data reception timeout. Regarding this, please try to bring your phone and EZVIZ device closer and tap “Retry”.
If you need to export some clips on your monitor, please follow the steps below to export recordings:
1. Log into your DVR/NVR monitor.
2. Connect your external USB storage device to your DVR/NVR’s USB port.
3. From the top menu, Click on “Device Management”.
5. From the menu on the left, Click on “Advanced Settings”-- “Export”.
6. Select the video(s) you want to export, select the time and date you wish to export and click on the “Export” tab on the bottom of the page, select the destination location on your USB External Storage device and complete the process.
If you need to export some clips remotely on your mobile phone:
Unfortunately, the EZVIZ mobile app does not support selecting and downloading clips directly, so you may export on the monitor or you may manually record the clips you would like on the EZVIZ app to export by following the steps below:
1. Log into your EZVIZ account and tap on the device cover picture to go to the Live View page.
2. From the Live View tap on the "Record" icon and the recording will start, tap on the icon to stop the recording.
3. Go back to the Home page, then from the top left corner tap on the "Profile" icon, then tap on "My Album".
4. Locate the video you just recorded and save it to your mobile device.
If you're having trouble charging your EZVIZ camera with the power cable, here are some troubleshooting steps you can follow:
1. Check the power source: Make sure the power outlet you're using is working properly. You can also try plugging the camera into a different outlet.
2. Check the power cable: Make sure the power cable is not damaged or frayed. You may also try using a different charging cable to see if that solves the problem.
3. Reset the camera: If there is still remaining power in the camera, you can try resetting the camera by pressing and holding the reset button for about 10 seconds. This will typically restore the camera to its default settings and may help resolve any charging issues.
If your issue is related to the camera not charging via a solar panel, please consider the following:
1. Ensure correct installation and angle for the solar panel:
- Please do not place the solar panel under shades and ensure it gets the most sunlight.
- Please do not place the solar panel completely parallel to the ground to avoid dust or other dirt.
- The solar panel should be tilted to receive maximum solar radiation and the recommended tilt angle is 25°-40°.
2. Maintain the proper temperature range: Make sure the working environment temperature range for battery charging should be maintained at 0-45°C.
3. Verify the connection: Check that the camera is properly connected to the solar panel. You can check this by ensuring that the indicator light is flashing green slowly or by looking for the solar icon on the app in the camera Settings.
4. Adjust camera settings: Switch to power-saving or super power-saving mode in the camera settings under Battery, and reduce the live view frequency to see if the battery level increases. If it does, the issue may be related to high alert or preview frequency, which can cause the camera to consume power faster than the solar panel can recharge it. Lowering the PIR sensitivity and reducing the preview frequency can improve charging efficiency.
5. Check the solar panel or test with a power adapter: If the camera still does not charge, try testing with a different, functioning solar panel if available. Alternatively, check whether the camera can be charged using a power adapter.
If the issue remains unresolved, please contact "EZVIZ support team" for further assistance.
EZVIZ Cameras have the option of setting a schedule for alarm notification pushes – this schedule will determine when you want to receive push notifications and when you want the alarms turned off.
Here is the step-by-step guide to enable you to perform this task:
(* The interface of the application may be different depending on the version update and the device model.)
1. Log in to your EZVIZ app.
2. Go to device settings > Message Notification > enable Receive Device Message, please ensure this button is on all the time, otherwise, you will not receive the notifications at all.
3. Go to Notification Schedule > Customized Schedule > Add Schedule to add a time segment, repeat the process for all the days you want the schedule to operate.
4. Tap Save on the top right corner to save the schedule.
5. Once you have completed the scheduling process, exit that page and turn off the main switch for EZVIZ APP Notification and the schedule will take effect next time segment you set.
If you encounter the situations during the initial setup of EZVIZ 4G cameras, after correctly inserting the SIM card, the camera prompts "Network connection failed", please follow the steps below:
1. Before trying again, please kindly note that a compatible SIM card and an active cellular data plan are required. For EB8 camera, you may check the compatible carrier information on https://www.ezviz.com/inter/product/EB8/46565#Carrier.
2. Please also ensure that the SIM card PIN is unlocked before being insert into the device.
3. If the device still prompts “Connection failed”, click on “Try APN Configuration" in the app interface and follow the app wizard. (If the indicator is not in fast-flashing blue, please press and hold the RESET button for 4s to reset the device).
When you ensure that the conditions for APN Configuration are met, please tap “Next” in the app interface.
4. Please input APN based on carrier info.“APN” and “Authentication Type” are required information. For APN information, please liaise with your carrier. After filling in the relevant information, please tap “Submit”.
5. Please make sure that the conditions for APN Configuration are met:
1) The indicator is still in fast-flashing blue.
2) The environment is quiet and the phone stays close to device. Turn the volume of your phone's speaker to the maximum and place it next to the device's speaker. Observe whether the device emits two rapid beeping sounds. If it does, this means it has recognized the sound wave information sent from the app, and please wait for the configuration process finished. If you cannot hear the sounds, please reset the device again and return to the first step.
After completing the above steps, you can enjoy your EZVIZ 4G camera. If you need further assistance, don't hesitate to contact our support team for personalized guidance.
EZVIZ Cameras have the option of setting a schedule for device alarm notifications – this schedule will determine when you want to receive notifications and when you want the alarms turned off.
Here is the step-by-step guide to enable you to perform this task:
(* The interface of the application may be different depending on the version update and the device model.)
1. Log in to your EZVIZ app.
2. Go to device settings > Message Notification > enable Receive Device Message.
3. Tap Device Reminder Plan and add a time segment, repeat the process for all the days you want the schedule to operate.
4. Use the check mark on the top right corner to save the schedule.
5. Once you have completed the scheduling process, exit that page and turn off the main switch for Receive Device Message and the schedule will take effect next time segment you set.
Then you will receive the events on the Library page. If you want to receive the notifications pushed to your phone as well, turn on the EZVIZ APP Notification switch.
Please follow the steps below:
1. On the EZVIZ APP, tap the three-dot icon next to your camera name from the Home page to enter the Device Settings page.
2. Scroll down and tap "Auto Tracking" or "PTZ Settings", depending on your device model.
3. Enable or disable "Human Tracking", "Motion Tracking", or "Auto Zoom Tracking" depending on your device model.
We understand that you may be experiencing difficulties connecting your device online via an Ethernet cable. To troubleshoot the issue, we recommend the following steps:
1. Verify the router and cable: Ensure that both the router and cable are in proper working order. You can try using a different cable or connecting the cable to a different port on the router to eliminate any potential issues.
2. Test the connection: After checking the cable and router, attempt to establish a connection again and see if the problem persists. If it does, proceed to the next step.
If the issue persists despite trying different cables and ports, we recommend reaching out to our EZVIZ support team for further assistance.
Yes, the maps in the EZVIZ app be regionally segmented or merged.
You may place two fingers lightly on the screen and then slowly move them apart to enlarge the picture or pinch them together to make the picture smaller. For models such as DB2C, users can only zoom the picture when the live view is in Fisheye mode.
When you sign in to an untrusted phone terminal while you have Two-step verification turned on, you'll get a security verification code via Email or SMS, making sure you’re you.
To enable or disable it, please follow the steps below:
Step 1: Log in to your EZVIZ account, tap the profile icon on the top left.
Step 2: Enter My Profile by clicking on the profile picture.
Step 3: Tap Login Settings.
Step 4: Tap Two-Step Verification and enable/disable the button.
No, the smart video doorphone does not support RTSP or ONVIF. For optimal control and operation of the device, we recommend using the EZVIZ App.
1. Ensure that you have connected your mobile device to the correct band. For EZVIZ devices support 2.4G Wi-Fi only, you must connect your mobile phone to 2.4G Wi-Fi.
2. Ensure that your Wi-Fi network connection is good. Most EZVIZ devices perform better when the upload speed is greater than 2 Mbps for each camera.
3. Ensure that your Wi-Fi network signal is good. Try to avoid obstacles and interferences such as walls, elevators, microwaves, washing machines, and Bluetooth devices.
RS2 has four cleaning modes: [Vacuum Before Mop], [Vacuum While Mop], [Vacuum Only], and [Mop Only].
To access the EZVIZ device settings page, you have two options:
1. From the Main Screen of the EZVIZ APP:
- Step 1: On the Home Page, tap the three-dot icon next to your camera name or serial number.
- Step 2: Tap "Device Settings" to enter the Settings page.
2. From the Live View Page of Your EZVIZ Device:
- Simply click the gear-like icon located in the top right corner of the live view page to access the Device Settings.
If you have any further questions or need assistance, feel free to contact the EZVIZ Support Team!
Yes, you can integrate additional screens with your smart home video doorphone. Specifically, you can connect the doorphones with the SD7 smart screen. This is particularly beneficial for larger homes, as the SD7 extends the communication capabilities of your existing EZVIZ Video Doorphones.
By placing the SD7 in various areas of your home, such as the bedroom or kitchen, you can easily respond to doorbell rings without having to rush to a distant monitor. With just a few taps on the SD7, you can see who is at the door and grant access immediately.
For instructions of how to link the video doorphone to the SD7 smart screen, please refer to: How to add your EZVIZ devices to the SD7 smart screen?
1. Ensure that you have given Location permission to the EZVIZ App.
2. Ensure that you do not turn on the VPN.
3. For iOS mobile devices, ensure that “Local Network” settings are turned on.
EZVIZ will provide security update for the TY1 up till 31th December 2025, and extended support may be provided after the stated date.
If you encounter a situation where the indoor monitor of the smart video doorphone reboots every time the lock is unlocked, please note that this appears to be a result of excessive lock power, as the power supply to the lock must not exceed 12V/1.1A to ensure smooth unlocking. If this is exceeded, please try the following to see if the problem can be resolved:
1. You can try lowering the screen brightness in settings > Screen and Image > Screen Brightness on the monitor.
2. If adjusting the brightness does not help, consider connecting a relay as described in the user manual. To do this, connect the relay to the lock terminals (indicated by a key symbol) on the back of the doorbell. Then, connect the other end of the relay to the positive and negative terminals of the lock.
3. Alternatively, you can try using a power supply with a 24V 1.5A input to see if that resolves the issue.
By following these steps, you should be able to address the rebooting issue with your indoor monitor. If the problem persists, please consider reaching out to our technical support team at support@ezviz.com for further assistance.
Please follow the steps below:
1. The App shows that the Robot is offline, but the device's WiFi indicator light remains on:
a. Log out of the App and log in again.
b. Reconnect the cellphone network (Wi-Fi or mobile network).
c. Restart the router.
2. The App shows that the Robot is offline and the Wi-Fi indicator light is always flashing:
a. Confirm whether the Robot is in a position where the Wi-Fi signal is weak.
b. Confirm whether the name or password of the Wi-Fi has been changed. If so, please reconfigure the network.
c. Please turn off the power supply of the Robot and restart it. After starting, please observe whether the Wi-Fi indicator light remains on. If it remains on, refresh the App to see if the Robot is online. If it flashes, it is recommended to restart the router. After the phone is connected to the network normally, open the App to check whether the Robot is online. If it still shows offline status, please reconfigure the network.
3. The Wi-Fi indicator light suddenly goes out in a daily state:
a. Check whether the Robot power supply is turned on.
b. In the power-on state, shortly press the reset button and observe the display status of the Wi-Fi light.
If you continue to encounter issues or have any further concerns, please don't hesitate to reach out to our customer support for further assistance.
Please kindly note that EZVIZ devices do not support NAS, but you may use an SD card or subscribe to Cloud Storage (available in certain markets and be subscribed by going to camera settings>Cloud Storage>Subscribe) to store recordings. For a compatible SD card, please click here for reference.
Regarding your issue, please kindly note that since the human body temperature is generally constant at around 37 degrees which emits infrared rays with a specific wavelength of about 10um, PIR detection is based on the induction of the infrared rays emitted by the human body.
Therefore, the detection accuracy is highly affected by the installation conditions and environment. You could choose to do the below modification to improve the PIR detection accuracy:
1) It is advised to install the device at a height of around 2-3 meters above the ground and at an angle of 20 degrees downward;
2) Ensure the device is kept away from air conditioners, refrigerators, stoves, and other areas like directly facing the window where the air movement is active;
3) Try to avoid obstacles and interference such as huge furniture and large bonsai;
In addition, please note that it is also related to the direction of the human movement. The PIR sensor is the least sensitive to the radial movement response, and the most sensitive to the transverse direction (that is, the direction perpendicular to the radius) movement.
Meanwhile, when the ambient temperature increases in summer, and the ambient temperature and the human body temperature might become relatively close, the detection function and sensitivity of the sensor might decrease, and sometimes the triggering might be not very sensitive as well.
Please note that for security reasons, it is sometimes necessary to reactivate the device before using it. Please follow the App Wizard or the steps below to reactivate your camera:
1. Tap “Activate device”.
2. Unplug the Ethernet cable or power cable and tick “The device is offline”, then tap “Next Step”.
3. Wait for the end of the offline detection process, and if successful, the page will jump to the “Take the device online” page.
4. Reconnect the Ethernet cable or power cable back and tick “The device is online”, then tap “Start Activate”.
5. Wait for the result of the activation, and if successful, you can then try to add your camera.
If you are experiencing issues with opening or closing the gate using the EZVIZ app or the indoor monitor—such as the mechanism attempting to close but then automatically reopening, or the gate opening and closing on its own—please follow the steps below:
1. Ensure that both the monitor and the doorbell have the latest firmware versions. You can check this by going to the "Settings" of each device separately in the EZVIZ mobile app, then navigating to "Device Information > Device Version".
2. On the monitor, go to "Settings > Screen and Image" and then adjust the "Gate-opening Command Time" to 3s, 2s, 1s, 0.3s, and 0.1s, respectively, to see if this resolves the issue.
If the problem persists, please reach out to our support team at support@ezviz.com and provide the following information:
- The serial numbers of the indoor panel and the outdoor intercom (doorbell).
- A photo of the gate motor nameplate.
- A photo of the current wiring setup.
- A video demonstrating the issue.
- The e-manual of your gate motor.
By following these steps, we hope to help you resolve the issue with your gate.
Please be advised that error code 330007 typically indicates a failure to connect to the server. Regarding this, please try to restart your mobile phone and EZVIZ device to reconfigure.
If the issue remains unresolved, please contact the "EZVIZ support team" for further assistance.
Before adding your other EZVIZ devices to the SD7 smart screen, please note the following:
1. Ensure that both the SD7 and your other EZVIZ devices are linked to the same EZVIZ account.
2. Enable “Terminal Authorization” for the SD7 device by navigating to its Device Settings > More > Terminal Authorization.
Next, please follow these steps to add your other EZVIZ devices to the SD7 screen:
1. On the home page, tap the SD7 device card to access the device linkage page.
2. Tap the “Link Device” button.
3. Select either a single device or multiple devices that you wish to link, then tap "Link". For smart video doorphone devices, please select their corresponding doorbell and make sure the that “Terminal Authorization” for the smart video doorphone devices are also enabled by navigating to Device Settings of their monitor> More > Terminal Authorization.
4. Wait for the confirmation message indicating “Linked successfully.”
5. Return to check the linked devices. If you wish to unlink any device, tap the three-dot icon located to the right of the device name. This will reveal the “Unlink” button.
Regarding the time problem you are experiencing, please try the following to see if it solves the problem:
1. Ensure that the device firmware is updated to the latest version, you can check the version in Camera Settings or on some models in Camera Settings > Device Information. If it is not the latest, you will be prompted to update.
2. Try resetting your device by pressing the reset button and then reconnecting to the network.
If the problem persiss or if you encounter any further difficulties, please don't hesitate to contact "EZVIZ support team" for additional assistance.
We understand that you are experiencing difficulty in sharing your EZVIZ device. Please follow the steps below to see if the issue can be resolved:
1. Sharing can only be done between EZVIZ users in the same region. Please ensure that the user you wish to share with has registered an EZVIZ account in the same region as yours, using their email address or phone number.
2. After you share the device, please confirm that the shared user has accepted the invitation in their EZVIZ account.
Related articles:
How can I change the account region?
After the router configured network, the EZVIZ smart home camera(s) can connect to the router's Wi-Fi by the function of One-Key Access.
If you set up EZVIZ security cameras or smart entry devices to keep an eye on your home but are concerned about potential privacy issues with your neighbors, drawing a privacy area can help you exclude areas you don’t want to include in your field of view.
These areas will be excluded when you view live or recorded footage. You can create up to four privacy areas for each EZVIZ device in your possession. If you prefer not to capture audio, you can disable the audio feature, which will ensure that your videos are completely silent.
Create, edit, or delete Privacy Areas
To create, edit, or delete Privacy Areas, please follow the steps below in the EZVIZ app:
1. From Home Page, tap the three-dot icon next to the device’s name or SN to enter the “Device Settings” page.
2. Scroll down to find “Privacy Settings”. Then tap “Customize the privacy area” and enter it. For some specific models, you can find “Customize the privacy area” directly at the bottom after you enter the Device Settings page.
3. Tap “Add an area”. Then you can tap the area to move it and drag the bottom right corner to modify the size.
4. Then click “Save” on the top right corner to complete the settings.
5. To edit an area, tap the area you would like to edit, then you can move it or drag the bottom right corner to modify the size. Then click “Save” on the top right corner.
6. To delete an area, tap the area you would like to delete and click “Delete the area”. Then click Yes to complete the settings.
Notes for Privacy Areas
1. The Privacy Area is NOT supported by all EZVIZ devices. You may review the detailed description on the product details page or contact our support team for more information.
2. Once configured, the masked area will be shown in both live view and recordings.
3. If your device position moves, the privacy areas will change, potentially no longer covering the intended zones.
*Related Articles:
How to enable or disable device audio?
To use the LAN Live View feature, you simply need to enter the default Admin password, which consists of a 6-character verification code in capital letters, and can be found on the white sticker attached to your device. There is no need to modify or change the default username. And if you are still prompted for an incorrect password, please check that you have entered the password correctly without any spaces. For more instructions of the device verification code, please refer to: Where to find the EZVIZ device verification code.
However, if the IPCs are initially set up by directly adding them to the EZVIZ NVR and not through the EZVIZ Mobile App, the admin password for LAN Live View will be the login password you set up for the NVR during the initial setup.
To factory reset your HP7, CP7, or EP7 video doorphone series, please tap "Settings>Firmware>Factory Reset" on the panel screen.
If you encounter a "wheel abnormal" prompt, please follow these steps:
1. Manually Rotate the Wheels: Check both wheels on the robot by manually rotating them. Look for any significant resistance or drag. If you notice high resistance in one or both wheels, inspect the wheel area for any debris or foreign objects that may be causing the issue.
2. Restart the Device: If there are no visible obstructions or if only one side has high resistance, try restarting the robot. After restarting, place the robot on a flat, even surface and initiate a cleaning cycle.
After completing these checks, see if the wheel issue is resolved. If you continue to experience problems, please contact our support team at cleaning.eu@ezviz.com for further assistance.
Applies to: DP1/DP2/CP4 door viewer
You may try the following steps to initially set up your EZVIZ door viewer with touch panel:
Step 1: Power on your device by pressing the power button.
Step 2: Click the "Settings" button on the screen.
Step 3: Tap "Network settings".
Step 4: Select the WiFi network you want to connect to.
Step 5: Enter the WiFi password until the connection is successful. Please ensure that your Wi-Fi password is less than 32 characters and excludes special characters.
If you fail to configure the device, we suggest you may check the below network requirements first:
1. Ensure that you have connected your mobile device to 2.4G Wi-Fi.
2. Ensure that your Wi-Fi network connection is good and functional. Most EZVIZ devices perform better when upload speed is greater than 2 mbps for each camera.
3. Ensure that your Wi-Fi network signal is good. Try to avoid obstacles and interference such as wall, elevator, microwave, washing machines, and Bluetooth devices.
4. Ensure that DHCP settings on your router is on.
5. Ensure that when you configure network, your EZVIZ device is close to your Wi-Fi router. We do suggest that you keep the distance shorter than 1.5 meter.
6. Ensure that the Wi-Fi security on your router is WPA or WPA2, and your Wi-Fi password is less than 32 characters and excludes special characters.
By following these steps, you can effectively troubleshoot and resolve issues with your EZVIZ door viewer's connection to Wi-Fi. If you need further assistance, don't hesitate to contact our support team for personalized guidance.
Applies to: HP3 Pro, EP3x Pro, CP3 Pro, EP7
We sincerely apologize that these devices are compatible only with the solar panel included in the package.
It is not advisable to use cleaning solutions from other brands. To ensure optimal results and avoid potential damage or adverse effects, it is recommended to use EZVIZ cleaning solution.
We understand that you are experiencing human detection problems with your EZVIZ door viewer. Regarding this, here are some troubleshooting tips that we suggest you try.
1. Ensure the firmware of your device is up to the latest. (Check firmware version in device Settings > Device Information. If not the latest, you would be prompted to upgrade it.)
2. Check sensitivity settings. In device settings > Intelligent Detection > Detection Sensitivity, under PIR Infrared Detection, move the slider to the right to increase the sensitivity level.
3. Try to turn off Loitering Detection or decrease the period (also in device Settings > Intelligent Detection), as the longer the period is, the more time the device will need to trigger detection.
4. Try to select High-Performance Mode (in device Settings > Battery> Working Mode) and check whether you will receive more alarms.
5. Try horizontal movement and see whether the device would be triggered, as all PIR sensors are more sensitive to horizontal movements than vertical movements.
6. Try to reset the device
Any IPC/security camera that supports ONVIF protocol or EZVIZ proprietary protocol.
Regarding this issue, please try the following troubleshooting steps:
- Ensure that the power source is functioning properly.
- Examine the charging contacts on both the robot and the charging dock. Make sure they are clean and free from dust or dirt. If you notice any debris, use a damp cloth or wet wipes to clean the contacts before attempting to charge again.
- Please turn off the Charging in off-peak time feature on the EZVIZ APP by going to the Device Settings page>More>Charging in off-peak time.
After performing these checks, see if the charging issue is resolved. If you continue to experience problems, please reach out to our support team at cleaning.eu@ezviz.com for further assistance.
If your smart lock being unable to remote unlock, please kindly follow the steps below:
1. Please make sure your smart lock is running on the latest device firmware.
2. Please check and select the time zone for the smart lock again (device Settings>Device information>Time zone).
3. If you are using the DL01S smart lock, please make sure the lock is connected with the A3 gateway via Wi-Fi connection and its keypad as well.
If you need further assistance, please contact the EZVIZ support team for personalized guidance.
Kindly note that the actual battery life will vary depending on environmental factors, network stability and the frequency of lock activities.
Thus, to optimize the battery life, we suggest you check the following:
1. Weak Wi-Fi connection. Please ensure the network connection is good and there is no barrier or radio interference between your lock and your router, causing unstable network.
2. Please make sure your device is running on the latest firmware.
3. Meanwhile, for smart lock DL03, DL04, DL50FVS, you can try enabling Power-saving Mode in device Settings>Battery to reduce battery drain.
If you need further assistance, please contact the EZVIZ support team for personalized guidance.
Regarding the overlapped map or if your robot always creates new maps, we recommend checking if there have been any changes in the environment or location around the base station, as this may lead to localization failures. Typically, a localization failure requires the map to be redrawn.
Please ensure that there is sufficient clearance on both sides of the base station to allow the robot to return to its charging dock properly. Additionally, we suggest deleting the new map and recreating it to see if the problem is resolved.
Moreover, please inspect your home for areas that could easily cause the robot to get stuck, such as the base of a fan. Robots often encounter difficulties in these zones. We recommend marking these areas as small no-go zones on the map.
If you need further assistance, please contact the EZVIZ support team for personalized guidance.
To troubleshoot charging issues, ensure that the power source is functioning properly and that the RH1 device is correctly inserted into the dock. You should hear a charging notification when the device starts charging.
To further troubleshoot, please follow these steps:
1. Remove the RH1 from the dock.
2. Press and hold the power button for 3 seconds to check if the device powers on.
3. Check the battery level displayed on the screen:
- If the battery level shows 100% and this is your first time using the device, please note that this phenomenon is normal. We recommend fully depleting the battery before recharging it each time. During the initial charging cycles, the device automatically calibrates the battery, so after each full charge, the screen will turn off to enter power-saving mode.
- If this is not the case or if you encounter any other issues, please don't hesitate to reach out to EZVIZ customer support for additional assistance.
To obtain the code, please the battery cover and check the "Management code" on the sticker.
EZVIZ products do not support FTP protocol.